30 May 2011

VI customizations for syntax coloring, auto-indenting and more

A colleague recently sent me a VIM resource file to configure how VIM displays code.

A small set of simple changes, but the effect is very nice and makes the casual viewing of code, scripts, etc. much nicer with line numbering, auto-indenting,  syntax color coding, etc.
$ cat ~/.vimrc

set shiftwidth=2 
set tabstop=2 
set number 
set ruler 
set expandtab 
set smartindent 
set autoindent 
set showmatch 
:syntax enable 
highlight Statement ctermfg=white
highlight PreProc ctermfg=3
set pastetoggle=<F10>

This is what it looks with a Java file:

Thanks Mark.

26 May 2011

Applying WLS CAT to WLS 10.3.3

To help answer an OTN question today regarding the use of the domain/lib directory on WLS 10.3.3, I went to use the CAT utility (as I've become accustomed) and then realized we'd only added it from the WLS 10.3.4 onwards.

As far as I'm aware, we don't make use of any newer APIs in WLS 10.3.4 within CAT, so I simply copied out the wls-cat.war file from a WLS 10.3.4 installation and deployed it to the WLS 10.3.3 domain I was using for the test.

The WLS CAT application deployed successfully and then seemed to work normally, letting me locate exactly where class I was using was being loaded from on WLS 10.3.3.

Of course this is totally unsupported, but if you're in need of WLS CAT on an earlier 10.3.x release and of the adventurous spirit, give it a shot.  You can always undeploy it if it doesn't work for you.

19 May 2011

Deploying a Random JSF 2.0 Example on WebLogic Server using Maven and NetBeans and Maven

I had a bit of a hunt around yesterday looking for some JSF 2.0 example applications to deploy.  I quickly came across a comprehensive JSF 2.0 tutorial @ http://www.coreservlets.com/JSF-Tutorial/jsf2/ published by Marty Hall.

For each of the tutorial sections on this site, the example code and pages that are used to demonstrate the concepts and discussion are published as accessible source code.

So I thought I'd try a few of them out with WebLogic Server 10.3.5. 

The examples I looked at didn't contain a build script, so I very simply converted them into Maven projects, which I then was able to open immediately in NetBeans (this feature rocks!).  I then built, packaged and ran the application on a WebLogic Server 10.3.5 domain, all from NetBeans.

All up, I'd say it tool ~2 mins to get the example loaded and building in NetBeans and deployed to  WebLogic Server.

It takes a lot more to describe it below than it does to actually do it.

Here's what I did to get the data-tables example to build, package and deploy to WebLogic Server. 

1. Download the zip file from http://www.coreservlets.com/JSF-Tutorial/jsf2/code/data-tables.zip.

2. Extract the zip file to a local directory, which produces:

/data-tables/WebContent
/data-tables/src
/data-tables/build

3. Generate a Java EE  Web Application using the Maven Archetype mechanism.  What a great feature this is in Maven. 

$ mvn archetype:generate
...
[INFO] Generating project in Interactive mode
[INFO] No archetype defined. Using maven-archetype-quickstart (org.apache.maven.archetypes:maven-archetype-quickstart:1.0)
Choose archetype:
...
263: remote -> webapp-j2ee13 (-)
264: remote -> webapp-j2ee14 (-)
265: remote -> webapp-javaee6 (-)
266: remote -> webapp-jee5 (-)
...
Choose a number: 107: 266
Choose version:
1: 1.0
2: 1.0.1
3: 1.1
4: 1.2
Choose a number: 4:
Define value for property 'groupId': : coreservlets
Define value for property 'artifactId': : data-tables
Define value for property 'version':  1.0-SNAPSHOT: :
Define value for property 'package':  coreservlets: :
Confirm properties configuration:
groupId: coreservlets
artifactId: data-tables
version: 1.0-SNAPSHOT
package: coreservlets
 Y: : y

4. Copy the WebContent and src directories from the data-tables example into the new Maven project structure.

$ cp -rp ~/Projects/Java/data-tables/WebContent/* src/main/webapp/
$ cp -rp ~/Projects/Java//data-tables/src/ src/main/java/


5. Start NetBeans and simply open the data-tables/pom.xml file to load the project into the IDE.


Click around and explore the project to get a sense of what it contains.


6. Add the jsf-api dependency to the POM so the ManagedBean classes can be compiled.

You can either manually add this direct to the pom.xml as:
    
    <dependency>
        <groupId>javax.faces</groupId>
        <artifactId>jsf-api</artifactId>
        <version>2.0</version>
        <scope>provided</scope>
    </dependency>


Or use the "Add Dependency" option on the project to search for it and enter it via a dialog:


7. Add a weblogic.xml deployment descriptor to reference the JSF 2.0 shared-library deployed on the WLS domain.

I simply coped in an existing version of the file I had used before.  You can also use the "New --> WebLogic --> WebLogic Descriptor" option in NetBeans to add it.


Add a library-ref to the jsf-2.0.war shared-library deployed on the WLS 10.3.4 domain.

<?xml version="1.0" encoding="UTF-8"?>
<weblogic-web-app>
  <context-root>/data-tables-1.0-SNAPSHOT</context-root>
  <library-ref>
    <library-name>jsf</library-name>
    <specification-version>2.0</specification-version>
    <implementation-version>1.0.0.0_2-0-2</implementation-version>
  </library-ref>

</weblogic-web-app>

8. Run the project, select the WLS 10.3.5 Server type and watch it get built and packaged via Maven and deployed by NetBeans.  This will start the WLS 10.3.5 server if necessary.


9. View the example application in a browser


Summary: there it is, a random JSF 2.0 example application, converted to a Maven project, opened in NetBeans and deployed to WebLogic Server 10.3.5, all in ~ 2mins.

First Adelaide Java User Group Session @ Oracle

Tonight sees the first time that the Adelaide Java User Group meeting is being hosted @ the local Oracle office.  

The session should be interesting with Derek Webber presenting on his area of expertise in Meta-programming with Groovy.

Meta-programming with Groovy

Meta-programming is a term to describe modifying code at runtime and is a very old idea in Computer Science. Groovy (now at 1.8) is a language that builds features directly on top of Java and aims to help developers be more productive. It’s meta-programming features provide a great number of opportunities to developers that are either really difficult to access or are all but impossible in plain Java. I will provide an overview of the Groovy Meta Object Protocol, along examples of what you can do with it. In particular it helps with:
  • easier reflection and adding behaviour dynamically
  • monkeypatching and extending existing 3rd party code
  • builders and domain-specific languages (DSLs)
For any local Adelaide folks interested in attending, the registration link is here: 
http://www.jugevents.org/jugevents/event/registration.form?event.id=38181

17 May 2011

Observing Bean Validation at JPA Level

A quick followup to yesterdays posting regarding the use of JSF 2.0, JPA 2.0 and Bean Validation.

To verify the validation of the constraints at the JPA level, and not at the JSF front end, I decided to add a simple Servlet which calls the WidgetFacadeLocal directly to create a new Widget entity.

This led to a small, interesting side excursion.

Since the NetBeans project was defined as a Java EE 6 Web Application, when the new Servlet was added, the default option was to not generate a web.xml descriptor to describe the Servlet configuration and mapping, and instead to define the Servlet using the @WebServlet annotation on the Servlet class itself.

@WebServlet(name = "TestValidationServlet", urlPatterns = {"/TestValidationServlet"})
public class TestValidationServlet extends HttpServlet {
    ....
}


Now this won't deploy in this form to WebLogic Server 10.3.4 since it doesn't yet implement the Servlet 3.0 specification and support @WebServlet.  But ... WebLogic Server has provided it's own specific annotation for Servlets since the 10.3 timeframe.

http://download.oracle.com/docs/cd/E17904_01/web.1111/e13712/annotateservlet.htm#i161636

Therefore to have this Servlet deploy and run on WebLogic Server, without introducing a web.xml file, the @WLServlet annotation can simply be added to the Servlet class, looking like this:

@WebServlet(name = "TestValidationServlet", urlPatterns = {"/TestValidationServlet"})
@weblogic.servlet.annotation.WLServlet(name = "TestValidationServlet", mapping = "/TestValidationServlet")
public class TestValidationServlet extends HttpServlet {
    ....
}

At compile time, add a reference to $WL_HOME/modules/com.bea.core.weblogic.web.api_1.4.0.0.jar to make the annotation available and it'll build and package successfully.

With that small excursion done, and the Servlet able to be deployed to WebLogic Server with the addition of the single @WLServlet annotation, the JPA validation can be tested.

This can be simply done again by injecting the stateless session bean WidgetFacadeLocal using an @EJB annotation, then creating a Widget with a known invalid property, and attempting to persist it through the session bean.  Any validation constraints that are violated will be detected and returned in an EJBException that can be checked, and displayed.

...
@EJB WidgetFacadeLocal widgetFacade;
...
protected void processRequest(HttpServletRequest request, HttpServletResponse response)
                throws ServletException, IOException {
    ....
    try {      
        Widget widget = new Widget();
        widget.setName("My Widget");
        widget.setEmail("bogus.email.com");
        widgetFacade.create(widget);
   
    } catch (EJBException ejbex) {
        out.printf("<p>EJBException, caused by: %s</p>", ejbex.getCause().getClass().getName());
        if (ejbex.getCausedByException() instanceof ConstraintViolationException) {
            ConstraintViolationException cve = (ConstraintViolationException) ejbex.getCausedByException();
            out.printf("<p>Constraint Validations:</p>");

            out.println("<ul>");
            for(ConstraintViolation cv: cve.getConstraintViolations()) {
                out.printf("<li>%s, <b>%S</b>, %s, <span style='color: red;'>%s</span></li>",
                        cv.getRootBeanClass().getSimpleName(),           
                        cv.getPropertyPath(),
                        cv.getMessage(),
                        cv.getInvalidValue());
            }          
            out.println("<ul>");
        }          
    }    
}     

Here the Widget has an email address which is not valid, as well as missing the mandatory pricePerUnit property.

Deploying this to the WebLogic Server 10.3.4 domain used previously with JPA 2.0 enabled, and Bean Validation library added to the server classpath, the simple test shows that the Bean Validations are checked.   An exception is returned that contains the set of constraint violations that occurred, which can be displayed to a user.


This demonstrates the use of implicit Bean Validation through using JPA 2.0 running on WebLogic Server 10.3.4.

Again, the key is to firstly ensure that the Server ClassPath is set to include the following libraries to expose and enable JPA 2.0 and have the Bean Validation implementation be visible to the JPA 2.0 provider:
  • $WLS_HOME/modules/com.oracle.jpa2support_1.0.0.0_2-0.jar
  • $WLS_HOME/modules/javax.persistence_1.0.0.0_2-0-0.jar
  • $GF_HOME/glassfish3/glassfish/modules/bean-validator.jar
And secondly, ensure that either the default JPA provider on the domain is set to TopLink, or the provider is specifically set to be org.eclipse.persistence.jpa.PersistenceProvider in persistence.xml within the application.

16 May 2011

JSF 2.0, JPA 2.0 and Bean Validation on WebLogic Server

For some time now, I’ve been meaning to build a simple application to demonstrate the use of JSF 2.0, JPA 2.0 and Bean Validation with WebLogic Server 10.3.4.  But I hadn’t gotten around to it until I had a couple of hours free late last week.

Seeing as I didn’t have all that much time, I thought I’d try and repurpose the Java EE 6 CRUD (create-remove-update-delete) application that NetBeans generates for GlassFish 3.x, and see if I could get it to run on WebLogic Server. 

The short answer to that was a resounding yes, with only a few minor changes or tricks.

In this blog, I’m going to step through what I did and highlight the changes that I played around with in order to make it work.  I'm not going to make this a tutorial (at this point) since most of the steps that are required are simply using the NetBeans IDE and its wizards to generate the requisite components and pages.

Developing the Application
  1. The starting point for this app was a single table, Widgets, created in a local Derby database. 

  2. Using NetBeans 7.0, a new Java EE Enterprise Application was created, using Java EE 6 and targetted at the GlassFish 3.1 server installed with NetBeans.  This produces two child projects: a Web project and an EJB project.


  3. In the EJB project, use the "Entity Classes from Database" to generate a JPA 2.0 Entity from the Widget table.


    Worth pointing out here is the use of the Bean Validation specification to declare constraints on the various fields of the Widget entity. 

    I particularly appreciated the smarts NetBeans uses to provide a suggested @Pattern regular expression for an email field

    @Pattern(regexp="[a-z0-9!#$%&'*+/=?^_`{|}~-]+(?:\\.[a-z0-9!#$%&'*+/=?^_`{|}~-]+)*@(?:[a-z0-9](?:[a-z0-9-]*[a-z0-9])?\\.)+[a-z0-9](?:[a-z0-9-]*[a-z0-9])?", message="Invalid email")//if the field contains email address consider using this annotation to enforce field validation
    @Size(max = 100)
    @Column(name = "EMAIL")   
    private String email;

  4. Next, invoke the "Sessions Bean For Entity Classes ..." to generate a session facade with CRUD methods for the Widget entity. 


    Worth noting here are two points:   First, the use of a Generics based Abstract class for the base CRUD operations, which is then subclassed by the WidgetFacade session bean to work specifically with the Widget entity.  Second, the use of the JPA 2.0 Criteria API to build a number of queries in the base class.

    public List<T> findRange(int[] range) {
        javax.persistence.criteria.CriteriaQuery cq getEntityManager().getCriteriaBuilder().createQuery();
        cq.select(cq.from(entityClass));
        javax.persistence.Query q = getEntityManager().createQuery(cq);
        q.setMaxResults(range[1] - range[0]);
        q.setFirstResult(range[0]);
        return q.getResultList();
    }

    This session bean is created with a local interface since the EJB 3.0 implementation in WebLogic Server requires the use of a business interface.

  5. In the persistence.xml file, a trick worth keeping in mind here which may save you some pain later is to explicitly specify the JPA provider to use.  This helps later on when you deploy the completed application to WebLogic Server, where the default JPA provider is Kodo/OpenJPA.  This can be overridden at the WLS domain level, but setting it in persistence.xml within the application itself is an easy way to do it now.

    <provider>org.eclipse.persistence.jpa.PersistenceProvider</provider>

    For more details on changing the default JPA provider for a WLS domain, see here:

    http://buttso.blogspot.com/2010/05/changing-default-jpa-provider-in.html

  6. With the EJB project now complete, the JSF pages can be generated for the application.  In the Web project, this is done using the "JSF Pages from Entity Classes ..." wizard. 


    What this wizard generates is a set of JSF pages to represent each of the CRUD operations, a Controller ManagedBean to handle the various tasks required by each of the JSF view pages and the data interactions (with paging) and a EJB 3.1 @Stateless session bean to act as a session facade on the Widget entity.

    The new EJB in WAR packaging option available with Java EE 6 is not yet available on WebLogic Server, so the first trick here is to change the Web project to use the session facade that has already been generated in the EJB project.  This is possible because the NetBeans wizards generate the same underlying code for the session facade whether it is for an EJB specific project or as part of the JSF Pages for Entity Classes wizard. 

    Delete the session bean bean in the Web project, then adjust the JSF controller to use the local interface for the session bean in the EJB project:

    //@EJB
    //private sab.demo.widget.service.WidgetFacade ejbFacade;
    @EJB
    private sab.demo.widget.service.WidgetFacadeLocal ejbFacade;

    Note that EJB 3.1 supports a No-Interface view of an EJB, which WebLogic Server doesn't yet support.  So here we have changed the injection point to use the Local interface from our EJB project.

    There is also a getFacade method which needs this simple type change as well:

    //private WidgetFacade getFacade() {
    private WidgetFacadeLocal getFacade() {
        return ejbFacade;
    }

  7. Delete the persistence.xml file generated within the Web project, since this will now be supplied with the EJB project.

  8. Modify the web.xml file and change the "version" attribute to be "2.5" to specify a valid version for WebLogic Server:

    <web-app version="2.5" ... >

  9. Using the "New ..." wizard, add a WebLogic Deployment descriptor to the Web project, and specify a shared library reference to the JSF 2.0 shared library that WebLogic Server supplies.

    <?xml version="1.0" encoding="UTF-8"?>
    <weblogic-web-app>
        <context-root>Widget</context-root>
        <library-ref>
            <library-name>jsf</library-name>
           <specification-version>2.0</specification-version>
           <implementation-version>1.0.0.0_2-0-2</implementation-version>
        </library-ref>   
    </weblogic-web-app>

    See the links for more details about JSF 2.0 and WebLogic Server, including instructions for how to deploy and reference the shared-library:

    http://buttso.blogspot.com/2010/05/jsf-20-support-in-weblogic-server-1033.html
    http://buttso.blogspot.com/2011/03/jsf-with-managed-beans-and-dependency.html

  10. Build the final application into an EAR file that is ready for deployment.

    Deploying the Application to WebLogic Server
    1. To deploy a JSF 2.0 application to WebLogic Server, the JSF 2.0 shared-library must be deployed.  See links referenced above for details on how to do this.

      http://buttso.blogspot.com/2010/05/jsf-20-support-in-weblogic-server-1033.html
      http://buttso.blogspot.com/2011/03/jsf-with-managed-beans-and-dependency.html

    2. To use JPA 2.0 with WebLogic Server, two optional libraries within the WebLogic Server installation must be placed into the classpath.  This can be automated through the use of a SmartUpdate patch, or it can be performed manually by setting a PRE_CLASSPATH environment variable and specifying the required libraries before starting the WebLogic Server domain. 

      $ export PRE_CLASSPATH=/Users/sbutton/Java/wls-1035-dev/modules/com.oracle.jpa2support_1.0.0.0_2-0.jar:/Users/sbutton/Java/wls-1035-dev/modules/javax.persistence_1.0.0.0_2-0-0.jar
      See the documentation for more details as needed:

      http://download.oracle.com/docs/cd/E17904_01/web.1111/e13720/using_toplink.htm#CIHDJHHI

    3. The application is also using the Bean Validation specification which is not supplied with WebLogic Server 10.3.4.  To ensure that the JSF 2.0 and JPA 2.0 implementation in TopLink can see the Bean Validation implementation and automatically enlist it's services, I added it as an additional library to the PRE_CLASSPATH environment variable:

      $ export PRE_CLASSPATH=${PRE_CLASSPATH):/Users/sbutton/Java/glassfish-31/glassfish3/glassfish/modules/bean-validator.jar

      Note here I am just referencing the library from a local GlassFish installation I have.  I could copy this library out into a separate location or even download it independently and reference it.  Call me lazy if you will ... :-)

    4. Start a WebLogic Server domain

    5. Using the WebLogic Console, configure the required datasource (jdbc/sample) to point at the Derby database and test to ensure it is working.

    6. Using the console, deploy the application.


    Test the application

    With the application deployed, it can be tested to observe the JSF 2.0, JPA 2.0 and Bean Validation uses working on WebLogic Server.

    For instance, create a new Widget and specify an incorrect email address.  You'll see that JSF will automatically detect the invalid value based on the @Pattern constraint set on the Widget entity, and display the accompanying message as an error message on the page.


    Correcting the email address value, the entry can be successfully be saved.


    Looking at the stdout on the console where the WLS domain was started, the use of JPA 2.0 via EclipseLink and the automatic enlistment of the Bean Validation implementation can be seen in the lines below:

    <May 16, 2011 3:58:26 PM CST> <Notice> <WebLogicServer> <BEA-000360> <Server started in RUNNING mode>
    May 16, 2011 3:58:40 PM org.hibernate.validator.util.Version <clinit>
    INFO: Hibernate Validator 4.1.0.Final
    May 16, 2011 3:58:40 PM org.hibernate.validator.engine.resolver.DefaultTraversableResolver detectJPA
    INFO: Instantiated an instance of org.hibernate.validator.engine.resolver.JPATraversableResolver.
    <May 16, 2011 3:58:40 PM CST> <Notice> <EclipseLink> <BEA-2005000> <2011-05-16 15:58:40.781--ServerSession(1625943009)--EclipseLink, version: Eclipse Persistence Services - 2.1.3.v20110304-r9073>
    <May 16, 2011 3:58:40 PM CST> <Notice> <EclipseLink> <BEA-2005000> <2011-05-16 15:58:40.782--ServerSession(1625943009)--Server: 10.3.5.0>
    <May 16, 2011 3:58:41 PM CST> <Notice> <EclipseLink> <BEA-2005000> <2011-05-16 15:58:41.266--ServerSession(1625943009)--file:/Users/sbutton/Projects/Domains/wls1035/servers/AdminServer/tmp/_WL_user/Widget/qb0nwv/Widget-EJB.jar_Widget-EJBPU login successful>

    If you forget to specify the JPA provider using the <provider> element in config.xml and deploy the application to a default WLS domain, then you may see the following error message when you try and access the application:


    This exception indicates that an application is using the JPA 2.0 API, but WebLogic Server can't find a JPA 2.0 provider.  This is the default condition of a WLS domain where the Kodo/Open JPA 1.0 provider is supplied at runtime.
     
    This can be easily modified as described above by specifying an explicit <provider> value for EclipseLink (or Hibernate if you are using that) or by altering the default JPA provider at the domain level using the WebLogic Console:


    Summary

    It proved to be quite straight forward to take the Java EE 6 CRUD application generated by NetBeans and alter it slightly to deploy and run successfully on WebLogic Server 10.3.4, using it's JSF 2.0 and JPA 2.0 support.

    11 May 2011

    Markus Quick Tests RichFaces 4.0 on WLS 10.3.4

    Nice to see this blog from Markus Eisele (belatedly on my part) in which he describes how to do a quick test of the RichFaces 4.0 showcase deployed on WLS 10.3.4 using it's optional support for JSF 2.0:

    http://blog.eisele.net/2011/04/running-richfaces-400final-showcase-on.html

    Thanks Markus, will try it out.

    09 May 2011

    WebLogic Server 10.3.5 Available

    Oracle WebLogic Server 10.3.5 was released for download on OTN over the weekend.

    See the Quick View/Download page @
    http://www.oracle.com/technetwork/middleware/fusion-middleware/downloads/index.html

    16 March 2011

    Tutorial: JSF 2.0 and JPA 2.0 with WebLogic Server using NetBeans

    The NetBeans team have produced a new tutorial demonstrating using JSF 2.0, JPA 2.0 with WebLogic Server 10.3.4 and NetBeans 7.0.   The application uses the JPA entity and JSF page generation wizards to quickly produce a working application based on a sample schema.

     Developing an Enterprise Application for Oracle WebLogic Server

    From the WebLogic Server perspective, this tutorial demonstrates some of the nice integration points NetBeans now has with WebLogic Server.

    For instance, the tutorial shows how NetBeans discovers and presents the set of WebLogic Server supplied JSF shared-libraries to the developer to select from.


    It shows the resulting automatic configuration of the weblogic deployment descriptor to reference the chosen shared library, and finally it shows the automatic deployment that of the selected JSF shared library that NetBeans performs if necessary.  


    This all goes to make the use of JSF with WebLogic Server very straight forward.


    The tutorial also highlights the simple approach NetBeans exposes for developers to Enable JPA 2.0 on the target WebLogic Server domain that is being used for the application.


    All together this is a tutorial well worth taking a look at and stepping through to look at the generated code and pages.

    10 March 2011

    JSF with Managed Beans and Dependency Injection and WebLogic Server

    A question appears from time to time on various forums postings regarding the use of dependency injection within JSF Managed Beans when running on WebLogic Sever.  The usual problem reported is that the dependency injection simply does not work. 

    A recent example of this is here:

    http://forums.oracle.com/forums/thread.jspa?messageID=9418272&tstart=0#9418272

    The Short Story

    The short story is that WebLogic Server does indeed support the use of dependency injection, within Managed Beans in JSF applications.  The simplest way to get it to work is to use the documented mechanism of deploying and using the WebLogic Server supplied JSF shared-library, in which the WebLogic Server specific implementation of the com.sun.faces.spi.InjectionProvider class is supplied, and automatically configured as the InjectionProvider implementation on the Web container.

    It is this WebLogic Server specific class -- com.bea.faces.WeblogicInjectionProvider – in which the actual dependency injection calls are realized.  Without this class being present, the dependency injection calls from JSF essentially become NOOPs.

    See the documentation for more detailed instructions on how to deploy the JSF shared-library to WebLogic Server and reference it within applications.

    Configuring JSF and JSTL Libraries
    http://download.oracle.com/docs/cd/E17904_01/web.1111/e13712/configurejsfandjtsl.htm#i163440

    The Longer Story

    To provide support for multiple versions of JSF, WebLogic Server uses its it’s shared-library mechanism.  In a WebLogic Server installation, there are a set of “deployable-libraries” provided that can be deployed as libraries to a WebLogic Server domain to extend its base functionality, in this specific instance by providing a JSF runtime.
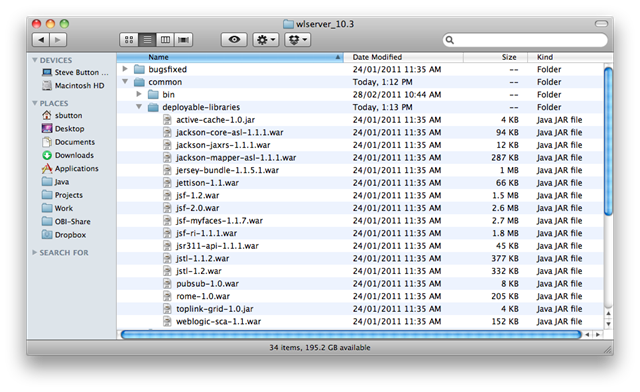
    deployable-libraries 

    The JSF 2.0 shared-library is represented by the jsf-2.0.war archive.  This archive contains the standard JSF and JSTL jar files, plus an additional library wls.jsf.di.jar

    jsf-2.0.war

    The wls.jsf.di.jar library contains a single class com.bea.faces.WeblogicInjectionProvider, which is the WebLogic Server specific implementation of the com.sun.faces.spi.InjectionProvider interface required to support dependency inject from JSF. 

    Furthermore, WebLogic Server detects when JSF is present in a web application by examining if the “jsf” shared-library is referenced, or if the Faces Servlet is configured, and automatically sets the ServletContext parameter com.sun.faces.injectionProvider parameter to the com.bea.faces.WebLogicInjectionProvider class to specify the InjectionProvider to use.

    ** See http://blogs.sun.com/rlubke/entry/jsf_ri_1_2_and for the details of this standard JSF SPI mechanism.

    wls.jsf.di.jar 

    public class com.bea.faces.WeblogicInjectionProvider implements com.sun.faces.spi.InjectionProvider {


        public com.bea.faces.WeblogicInjectionProvider();


        public void inject(java.lang.Object)  throws com.sun.faces.spi.InjectionProviderException;


        public void invokePostConstruct(java.lang.Object)  throws com.sun.faces.spi.InjectionProviderException;


        public void invokePreDestroy(java.lang.Object) throws com.sun.faces.spi.InjectionProviderException;


    }


    Thus without this wls.jsf.di.jar library and the com.bea.faces.WeblogicInjectionProvider class it contains that implements the JSF dependency injection SPI, any dependencies declared in the JSF application are not able to be fulfilled.


    Using WebLogic Server JSF Shared Libraries


    The simplest way to use dependency injection in JSF with WebLogic Server is to follow the documented approach for deploying and using JSF shared-library as referenced above.  Once the shared-library is deployed, applications use it by providing a reference in a weblogic deployment descriptor to the JSF library.  At runtime, WebLogic Server will arrange to have the contents of the shared-library made available for the application to use.


    For deployment of shared-libraries to WebLogic Server, the standard tools such as the console, or the weblogic.Deployer utility are used, specifying the deployment type as a library.
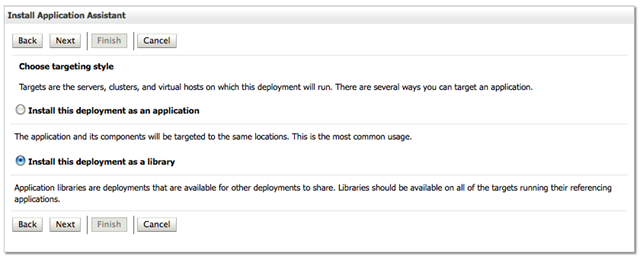


    console-library


    Screen shot 2011-03-10 at 1.26.17 PM


    With the JSF shared-library deployed to WebLogic Server, applications can reference it using a weblogic deployment descriptor.


    An example weblogic.xml deployment descriptor referencing the deployed JSF@2.0 shared-library is shown below.


    <?xml version="1.0" encoding="UTF-8"?>


    <weblogic-web-app xmlns="http://www.bea.com/ns/weblogic/90" xmlns:j2ee="http://java.sun.com/xml/ns/j2ee" xmlns:xsi="http://www.w3.org/2001/XMLSchema-instance" xsi:schemaLocation="http://www.bea.com/ns/weblogic/90 http://www.bea.com/ns/weblogic/90/weblogic-web-app.xsd">


      <jsp-descriptor>


        <keepgenerated>true</keepgenerated>


      </jsp-descriptor>


      <context-root>/WLS-JSF-EJB-DI-WEB</context-root>


      <library-ref>


        <library-name>jsf</library-name>


        <specification-version>2.0</specification-version>


        <implementation-version>1.0.0.0_2-0-2</implementation-version>


      </library-ref>  


    </weblogic-web-app>


    This is the documented and supported approach and is what we recommend based on the current architecture we use to support JSF.


    Embedding JSF within a Web Application


    A common arrangement for applications using JSF, is to provide the JSF jar files within the web archive itself, so that they are always available when the application is deployed.  It is this case typically where problems surface with dependency injection not working, since the WeblogicInjectionProvider class provider is not present, resulting in a NOOP when dependency injection calls are made.


    If this embedding approach is to be used, then the undocumented (and daresay unsupported at this time) approach to getting dependency injection to work in JSF, is to extract the wls.jsf.di.jar file from the jsf-1.2.war or jsf-2.0.war files from a WebLogic Server installation, and put it into the WEB-INF/lib directory of the web application, alongside the JSF jars.  When the application is deployed, the WeblogicInjectionProvider will be available.  This works because the web application initialization code we have, in addition to looking at the shared-library references, also checks to see whether the Faces Servlet -- javax.faces.webapp.FacesServlet -- is configured in web.xml.  If so, it sets the InjectionProvider property appropriately on the ServletContext of the web application, delegating the dependency injection operations to the WeblogicInjectionProvider.


    A Simple Example


    Right, with that explained (hopefully) lets take a look at a simple example in NetBeans.


    Here is a Java EE project with two modules: WLS-JSF-EJB-DI-WEB and WLS-JSF-EJB-DI-EJB:
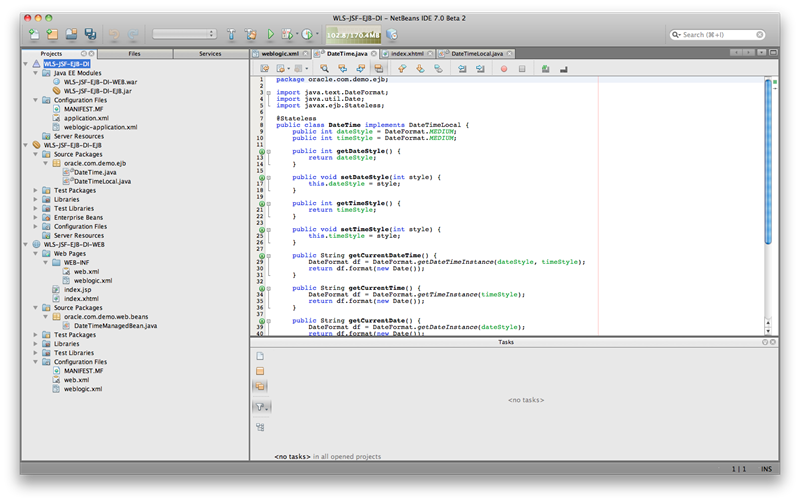


    netbeans-app


    In WLS-JSF-EJB-DI-EJB there is a single EJB 3.0 stateless session bean defined as follows:


    package oracle.com.demo.ejb;


    import javax.ejb.Local;


    @Local


    public interface DateTimeLocal {


        String getCurrentDateTime();


        String getCurrentTime();


        String getCurrentDate();


        int getDateStyle();


        int getTimeStyle();


        void setDateStyle(int style);


        void setTimeStyle(int style); 


    }


    This purpose of this EJB is to return a formatted string representing the current date and time.  The formatting of the date is controlled via the DateStyle and TimeStyle properties.


    In  the WLS-JSF-EJB-DI-WEB module, there is a single DateTimeManagedBean class, annotated with @ManagedBean (no faces-config.xml here!) and a single JSF facelet that uses the Managed Bean to displays the formatted date and time.  It also allows the user to change the formatting, again via the Managed Bean.


    The Managed Bean class uses an @EJB annotation to inject an instance of the DateTimeLocal EJB, and then delegates all work to it, in order obtain the appropriately formatted date and time string. 


    package oracle.com.demo.web.beans;


    import javax.ejb.EJB;


    import javax.faces.bean.ManagedBean;


    import oracle.com.demo.ejb.DateTimeLocal;


    @ManagedBean


    public class DateTimeManagedBean {


        @EJB


        DateTimeLocal dateTimeEJB;


        public int getDateStyle() {


            return dateTimeEJB.getDateStyle();


        }


        public int getTimeStyle() {


            return dateTimeEJB.getTimeStyle();


        }


        public void setDateStyle(int style) {


            dateTimeEJB.setDateStyle(style);


        }


        public void setTimeStyle(int style) {


            dateTimeEJB.setTimeStyle(style);


        }    


        public String getCurrentDateTime() {


            return dateTimeEJB.getCurrentDateTime();


        }


        public String getCurrentDate() {


            return dateTimeEJB.getCurrentDate();


        }


        public String getCurrentTime() {


            return String.format("%s", dateTimeEJB.getCurrentTime());


        }


        public String applyFormats() {


            return "index.xhtml"; // 


        }


    }


    The index.xhtml facelet uses the Managed Bean to sets and apply the formatting properties and obtain the current date and time in the desired format.


    Finally, a weblogic.xml file is provided in the WEB-INF directory that specifies the use of the jsf#2.0 shared-library. 


    ** NetBeans offers great support for WebLogic here.  When you add the “JSF Framework” to a project that is configured to run on WebLogic Server, NetBeans automatically offers you the choice of JSF implementations it is aware of on the server and generates the weblogic.xml file.  It will also transparently deploy the specified JSF shared-library to the target WebLogic Server domain if it is not already deployed. 


    When deployed to WebLogic Server 10.3.4, the resulting page looks like this:


    app1 


    Changing the format properties and applying them, the Managed Bean gets updated, which in turn makes the changes on the DateTimeLocal EJB, which ultimately returns the date and time in the specified format:


     app2


    This simple application demonstrates the successful use of JSF with a Managed Bean, which injects and uses an EJB 3.0 stateless session bean.


    I creates this sample application to assist an OTN question that was asked – the project can be be downloaded from here: http://bit.ly/wlsjsfejb.