Talking with Doug Clarke of EclipseLink fame and fortune last week, it sounds like there is some real interest from developers in wanting to update WebLogic Server to use later versions of the EclipseLink in order to access it's evolving feature set.
Which should offer no surprises really, EclipseLink rocks.
Investigation
Turning to the situation at hand, the main points to be addressed are:
1. The later versions of EclipseLink are JPA 2.0 based, so we'll assume that the predominant use case is centered around using JPA 2.0.
WebLogic Server supports JPA 2.0 through the application of a Smart Update patch or via manual adjustments to the PRE_CLASSPATH to incorporate two additional JAR files that enable the use of JPA 2.0.
We'll consider this one easy to handle using documented features.
2. WebLogic Server provides a version of EclipseLink that is loaded as one it's standard feature bearing modules and thus is present by default in the classpath of WebLogic Server for deployed applications. For WLS 10.3.5, this version is org.eclipse.persistence_1.1.0.0_2-1.jar.
WebLogic Server has a feature called the Filtering Classloader, which enables applications to selectively override the libraries from WebLogic Server that an application sees. This should allow an application to be configured to not use the default version of EclipseLink that WebLogic Server provides. This requires each application to specifically provide a weblogic-application.xml file that lists the <prefer-application-packages> configuration set to explicitly filter our the org.eclipselink.persistence package.
3. Any change to the EclipseLink version should be isolated to just an application, and not applied to an entire WebLogic Server installation or domain.
To make the later version of EclipseLink available, there are a few simple options available that could be explored: a) the EclipseLink jar file could be added to the CLASSPATH of WebLogic Server; b) the EclipseLink jar file could be dropped into the $domain/lib directory; c) the newer version of EclipseLink could be used to replace the existing EclipseLink jar file shipped with WebLogic Server, retaining the same name; d) the WebLogic Server shared-library mechanism could be used to deploy the EclipseLink libraries which applications can then selectively reference.
For the sake of expediency, I won't bother going through the pros/cons with each of those options and will just pick a winner from my perspective: the use of a shared-library to provide a selectively consumable version of EclipseLink.
Let's just examine this for a moment -- a WebLogic Server shared-library is an artifact that can be deployed to a WebLogic Server target, which can then be referenced by an application being deployed, whereupon WebLogic Server will merge the contents of the shared-library with the application. This enables common libraries to be deployed and used by multiple applications. Furthermore, shared-libraries can take the format of a standard Java EE archives, where descriptors can be provided which are then also merged with the final application deployment.
Given those capabilities:
a) it's possible to construct and deploy an EAR file based shared-library that contains a later version of EclipseLink and a weblogic-application.xml file which provides a preset prefer-application-packages setting that filters the org.eclipselink.persistence.* package.
b) to use a later version of EclipseLink, an application simply needs to include it's own weblogic-application.xml that imports the EclipseLink shared-library it need to use.
Thus, we have a supported deployment format (can be targeted at single nodes, clusters, whatever ...) to provide later versions of EclipseLink, which can be shared and selectively used by applications as desired.
Implementation
To test this out in an end-to-end manner, I performed the following steps:
1. Downloaded eclipselink-2.2.0.v20110202-r8913.zip from the EclipseLink web site.
2. Created a small ant project to produce an eclipselink-shared-lib.ear file. The layout of the shared-library is just a standard Java EE EAR file and contains the following items:
META-INF/weblogic-application.xml
META-INF/application.xml
lib/eclipselink.jar
The weblogic-application.xml file contains the following configuration elements:
<weblogic-application>
<prefer-application-packages>
<package-name>org.eclipse.persistence.*</package-name>
</prefer-application-packages>
</weblogic-application>
The application.xml was a necessary element to support the runtime library merging. As you can see from the below, it's basically a NOOP configuration file.
<application>
<display-name>eclipselink-shared-lin</display-name>
<module>
<java></java>
</module>
</application>
The ant build script produces an EAR file from these elements with one important addition that marks the EAR file as a shared-library for WebLogic Server by adding a number of attributes to the META-INF/MANIFEST.MF file:
<target name="package" depends="prepare">
<jar destfile="dist/${ant.project.name}.ear">
<metainf dir="etc" includes="*.xml"/>
<manifest>
<attribute name="Extension-Name" value="eclipselink"/>
<attribute name="Specification-Version" value="2.0"/>
<attribute name="Implementation-Version" value="2.2.0"/>
</manifest>
<fileset dir="build" includes="**/*"/>
</jar>
</target>
At deployment time, WebLogic Server will use the attributes as meta-data for the deployed shared-library.
The final EAR file looks like this:
sbutton:~/Projects/Java/eclipselink-shared-lib/dist $ jar tf eclipselink-shared-lib.ear
META-INF/
META-INF/MANIFEST.MF
META-INF/application.xml
META-INF/weblogic-application.xml
lib/
lib/eclipselink.jar
For reference, the simple ant project to build the eclipselink-shared-lib.ear file is here: eclipselink-shared-lib.zip.
3. Deployed eclipselink-shared-lib.ear to WebLogic Server. This results in a new library being available on the server, eclipselink#2.0@2.2.0.
4. Created a test application that imports eclipselink#2.0@2.2.0 and outputs the version of it that it is seeing.
The application uses a weblogic.xml to reference the eclipselink#2.0@2.2.0 shared-library that was deployed, which picks up both the new version of eclipselink.jar as well as the filtering-classloader description the library contains:
weblogic-application.xml:
<weblogic-application>
<library-ref>
<library-name>eclipselink</library-name>
<specification-version>2.0</specification-version>
<implementation-version>2.2.0</implementation-version>
</library-ref>
</weblogic-application>
Within the application, used a simple servlet that outputs the version of EclipseLink it is seeing:
out.printf("<p>EclipseLink Version: %s</p>", org.eclipse.persistence.Version.getVersionString());
5. Packaged the application into an EAR file and deployed it to WebLogic Server as an application.
When the application is accessed it reports the new version of EclipseLink supplied via the shared-library:
EclipseLink Version: 2.2.0.v20110202-r8913
6. Performed a negative test by undeploying the application, removed the weblogic-application.xml file from it and redeployed it.
When the application is accessed it reports the default version of EclipseLink that WebLogic Server supplies:
EclipseLink Version: 2.1.3.v20110304-r9073
7. With the basic premise validated, add a JPA module to validate the code-weaving EclipseLink performs works as expected. To verify the version EclipseLink is using the EclipseLink log level was set to fine and the console output reviewed, which showed up as Eclipse Persistence Services - 2.2.0.v20110202-r8913
Summary
The use of WebLogic Server shared-libraries appears to be a very suitable model for providing later versions of EclipseLink that automatically filter out the WebLogic Server supplied versions, which applications can selectively choose to import when they need the later versions.
This was just a simple test of the concept of using WebLogic Server shared-libraries to do this. The EclipseLink/TopLink team are in the throes of formally certifying this approach, so keep an eye out for it on the EclipseLink site if it does pass full muster!
Showing posts with label JPA. Show all posts
Showing posts with label JPA. Show all posts


17 May 2011
Observing Bean Validation at JPA Level
A quick followup to yesterdays posting regarding the use of JSF 2.0, JPA 2.0 and Bean Validation.
To verify the validation of the constraints at the JPA level, and not at the JSF front end, I decided to add a simple Servlet which calls the WidgetFacadeLocal directly to create a new Widget entity.
This led to a small, interesting side excursion.
Since the NetBeans project was defined as a Java EE 6 Web Application, when the new Servlet was added, the default option was to not generate a web.xml descriptor to describe the Servlet configuration and mapping, and instead to define the Servlet using the @WebServlet annotation on the Servlet class itself.
@WebServlet(name = "TestValidationServlet", urlPatterns = {"/TestValidationServlet"})
public class TestValidationServlet extends HttpServlet {
....
}
Now this won't deploy in this form to WebLogic Server 10.3.4 since it doesn't yet implement the Servlet 3.0 specification and support @WebServlet. But ... WebLogic Server has provided it's own specific annotation for Servlets since the 10.3 timeframe.
http://download.oracle.com/docs/cd/E17904_01/web.1111/e13712/annotateservlet.htm#i161636
Therefore to have this Servlet deploy and run on WebLogic Server, without introducing a web.xml file, the @WLServlet annotation can simply be added to the Servlet class, looking like this:
@WebServlet(name = "TestValidationServlet", urlPatterns = {"/TestValidationServlet"})
@weblogic.servlet.annotation.WLServlet(name = "TestValidationServlet", mapping = "/TestValidationServlet")
public class TestValidationServlet extends HttpServlet {
....
}
At compile time, add a reference to $WL_HOME/modules/com.bea.core.weblogic.web.api_1.4.0.0.jar to make the annotation available and it'll build and package successfully.
With that small excursion done, and the Servlet able to be deployed to WebLogic Server with the addition of the single @WLServlet annotation, the JPA validation can be tested.
This can be simply done again by injecting the stateless session bean WidgetFacadeLocal using an @EJB annotation, then creating a Widget with a known invalid property, and attempting to persist it through the session bean. Any validation constraints that are violated will be detected and returned in an EJBException that can be checked, and displayed.
...
@EJB WidgetFacadeLocal widgetFacade;
...
protected void processRequest(HttpServletRequest request, HttpServletResponse response)
throws ServletException, IOException {
....
try {
Widget widget = new Widget();
widget.setName("My Widget");
widget.setEmail("bogus.email.com");
widgetFacade.create(widget);
} catch (EJBException ejbex) {
out.printf("<p>EJBException, caused by: %s</p>", ejbex.getCause().getClass().getName());
if (ejbex.getCausedByException() instanceof ConstraintViolationException) {
ConstraintViolationException cve = (ConstraintViolationException) ejbex.getCausedByException();
out.printf("<p>Constraint Validations:</p>");
out.println("<ul>");
for(ConstraintViolation cv: cve.getConstraintViolations()) {
out.printf("<li>%s, <b>%S</b>, %s, <span style='color: red;'>%s</span></li>",
cv.getRootBeanClass().getSimpleName(),
cv.getPropertyPath(),
cv.getMessage(),
cv.getInvalidValue());
}
out.println("<ul>");
}
}
}
Here the Widget has an email address which is not valid, as well as missing the mandatory pricePerUnit property.
Deploying this to the WebLogic Server 10.3.4 domain used previously with JPA 2.0 enabled, and Bean Validation library added to the server classpath, the simple test shows that the Bean Validations are checked. An exception is returned that contains the set of constraint violations that occurred, which can be displayed to a user.

This demonstrates the use of implicit Bean Validation through using JPA 2.0 running on WebLogic Server 10.3.4.
Again, the key is to firstly ensure that the Server ClassPath is set to include the following libraries to expose and enable JPA 2.0 and have the Bean Validation implementation be visible to the JPA 2.0 provider:
To verify the validation of the constraints at the JPA level, and not at the JSF front end, I decided to add a simple Servlet which calls the WidgetFacadeLocal directly to create a new Widget entity.
This led to a small, interesting side excursion.
Since the NetBeans project was defined as a Java EE 6 Web Application, when the new Servlet was added, the default option was to not generate a web.xml descriptor to describe the Servlet configuration and mapping, and instead to define the Servlet using the @WebServlet annotation on the Servlet class itself.
@WebServlet(name = "TestValidationServlet", urlPatterns = {"/TestValidationServlet"})
public class TestValidationServlet extends HttpServlet {
....
}
Now this won't deploy in this form to WebLogic Server 10.3.4 since it doesn't yet implement the Servlet 3.0 specification and support @WebServlet. But ... WebLogic Server has provided it's own specific annotation for Servlets since the 10.3 timeframe.
http://download.oracle.com/docs/cd/E17904_01/web.1111/e13712/annotateservlet.htm#i161636
Therefore to have this Servlet deploy and run on WebLogic Server, without introducing a web.xml file, the @WLServlet annotation can simply be added to the Servlet class, looking like this:
@WebServlet(name = "TestValidationServlet", urlPatterns = {"/TestValidationServlet"})
@weblogic.servlet.annotation.WLServlet(name = "TestValidationServlet", mapping = "/TestValidationServlet")
public class TestValidationServlet extends HttpServlet {
....
}
At compile time, add a reference to $WL_HOME/modules/com.bea.core.weblogic.web.api_1.4.0.0.jar to make the annotation available and it'll build and package successfully.
With that small excursion done, and the Servlet able to be deployed to WebLogic Server with the addition of the single @WLServlet annotation, the JPA validation can be tested.
This can be simply done again by injecting the stateless session bean WidgetFacadeLocal using an @EJB annotation, then creating a Widget with a known invalid property, and attempting to persist it through the session bean. Any validation constraints that are violated will be detected and returned in an EJBException that can be checked, and displayed.
...
@EJB WidgetFacadeLocal widgetFacade;
...
protected void processRequest(HttpServletRequest request, HttpServletResponse response)
throws ServletException, IOException {
....
try {
Widget widget = new Widget();
widget.setName("My Widget");
widget.setEmail("bogus.email.com");
widgetFacade.create(widget);
} catch (EJBException ejbex) {
out.printf("<p>EJBException, caused by: %s</p>", ejbex.getCause().getClass().getName());
if (ejbex.getCausedByException() instanceof ConstraintViolationException) {
ConstraintViolationException cve = (ConstraintViolationException) ejbex.getCausedByException();
out.printf("<p>Constraint Validations:</p>");
out.println("<ul>");
for(ConstraintViolation cv: cve.getConstraintViolations()) {
out.printf("<li>%s, <b>%S</b>, %s, <span style='color: red;'>%s</span></li>",
cv.getRootBeanClass().getSimpleName(),
cv.getPropertyPath(),
cv.getMessage(),
cv.getInvalidValue());
}
out.println("<ul>");
}
}
}
Here the Widget has an email address which is not valid, as well as missing the mandatory pricePerUnit property.
Deploying this to the WebLogic Server 10.3.4 domain used previously with JPA 2.0 enabled, and Bean Validation library added to the server classpath, the simple test shows that the Bean Validations are checked. An exception is returned that contains the set of constraint violations that occurred, which can be displayed to a user.

This demonstrates the use of implicit Bean Validation through using JPA 2.0 running on WebLogic Server 10.3.4.
Again, the key is to firstly ensure that the Server ClassPath is set to include the following libraries to expose and enable JPA 2.0 and have the Bean Validation implementation be visible to the JPA 2.0 provider:
- $WLS_HOME/modules/com.oracle.jpa2support_1.0.0.0_2-0.jar
- $WLS_HOME/modules/javax.persistence_1.0.0.0_2-0-0.jar
- $GF_HOME/glassfish3/glassfish/modules/bean-validator.jar
16 May 2011
JSF 2.0, JPA 2.0 and Bean Validation on WebLogic Server
For some time now, I’ve been meaning to build a simple application to demonstrate the use of JSF 2.0, JPA 2.0 and Bean Validation with WebLogic Server 10.3.4. But I hadn’t gotten around to it until I had a couple of hours free late last week.
Seeing as I didn’t have all that much time, I thought I’d try and repurpose the Java EE 6 CRUD (create-remove-update-delete) application that NetBeans generates for GlassFish 3.x, and see if I could get it to run on WebLogic Server.
The short answer to that was a resounding yes, with only a few minor changes or tricks.
In this blog, I’m going to step through what I did and highlight the changes that I played around with in order to make it work. I'm not going to make this a tutorial (at this point) since most of the steps that are required are simply using the NetBeans IDE and its wizards to generate the requisite components and pages.
Developing the Application
With the application deployed, it can be tested to observe the JSF 2.0, JPA 2.0 and Bean Validation uses working on WebLogic Server.
For instance, create a new Widget and specify an incorrect email address. You'll see that JSF will automatically detect the invalid value based on the @Pattern constraint set on the Widget entity, and display the accompanying message as an error message on the page.

Correcting the email address value, the entry can be successfully be saved.

Looking at the stdout on the console where the WLS domain was started, the use of JPA 2.0 via EclipseLink and the automatic enlistment of the Bean Validation implementation can be seen in the lines below:
<May 16, 2011 3:58:26 PM CST> <Notice> <WebLogicServer> <BEA-000360> <Server started in RUNNING mode>
May 16, 2011 3:58:40 PM org.hibernate.validator.util.Version <clinit>
INFO: Hibernate Validator 4.1.0.Final
May 16, 2011 3:58:40 PM org.hibernate.validator.engine.resolver.DefaultTraversableResolver detectJPA
INFO: Instantiated an instance of org.hibernate.validator.engine.resolver.JPATraversableResolver.
<May 16, 2011 3:58:40 PM CST> <Notice> <EclipseLink> <BEA-2005000> <2011-05-16 15:58:40.781--ServerSession(1625943009)--EclipseLink, version: Eclipse Persistence Services - 2.1.3.v20110304-r9073>
<May 16, 2011 3:58:40 PM CST> <Notice> <EclipseLink> <BEA-2005000> <2011-05-16 15:58:40.782--ServerSession(1625943009)--Server: 10.3.5.0>
<May 16, 2011 3:58:41 PM CST> <Notice> <EclipseLink> <BEA-2005000> <2011-05-16 15:58:41.266--ServerSession(1625943009)--file:/Users/sbutton/Projects/Domains/wls1035/servers/AdminServer/tmp/_WL_user/Widget/qb0nwv/Widget-EJB.jar_Widget-EJBPU login successful>
If you forget to specify the JPA provider using the <provider> element in config.xml and deploy the application to a default WLS domain, then you may see the following error message when you try and access the application:

This exception indicates that an application is using the JPA 2.0 API, but WebLogic Server can't find a JPA 2.0 provider. This is the default condition of a WLS domain where the Kodo/Open JPA 1.0 provider is supplied at runtime.
This can be easily modified as described above by specifying an explicit <provider> value for EclipseLink (or Hibernate if you are using that) or by altering the default JPA provider at the domain level using the WebLogic Console:

Summary
It proved to be quite straight forward to take the Java EE 6 CRUD application generated by NetBeans and alter it slightly to deploy and run successfully on WebLogic Server 10.3.4, using it's JSF 2.0 and JPA 2.0 support.
Seeing as I didn’t have all that much time, I thought I’d try and repurpose the Java EE 6 CRUD (create-remove-update-delete) application that NetBeans generates for GlassFish 3.x, and see if I could get it to run on WebLogic Server.
The short answer to that was a resounding yes, with only a few minor changes or tricks.
In this blog, I’m going to step through what I did and highlight the changes that I played around with in order to make it work. I'm not going to make this a tutorial (at this point) since most of the steps that are required are simply using the NetBeans IDE and its wizards to generate the requisite components and pages.
Developing the Application
- The starting point for this app was a single table, Widgets, created in a local Derby database.
- Using NetBeans 7.0, a new Java EE Enterprise Application was created, using Java EE 6 and targetted at the GlassFish 3.1 server installed with NetBeans. This produces two child projects: a Web project and an EJB project.


- In the EJB project, use the "Entity Classes from Database" to generate a JPA 2.0 Entity from the Widget table.

Worth pointing out here is the use of the Bean Validation specification to declare constraints on the various fields of the Widget entity.
I particularly appreciated the smarts NetBeans uses to provide a suggested @Pattern regular expression for an email field
@Pattern(regexp="[a-z0-9!#$%&'*+/=?^_`{|}~-]+(?:\\.[a-z0-9!#$%&'*+/=?^_`{|}~-]+)*@(?:[a-z0-9](?:[a-z0-9-]*[a-z0-9])?\\.)+[a-z0-9](?:[a-z0-9-]*[a-z0-9])?", message="Invalid email")//if the field contains email address consider using this annotation to enforce field validation
@Size(max = 100)
@Column(name = "EMAIL")
private String email;
- Next, invoke the "Sessions Bean For Entity Classes ..." to generate a session facade with CRUD methods for the Widget entity.

Worth noting here are two points: First, the use of a Generics based Abstract class for the base CRUD operations, which is then subclassed by the WidgetFacade session bean to work specifically with the Widget entity. Second, the use of the JPA 2.0 Criteria API to build a number of queries in the base class.
public List<T> findRange(int[] range) {
javax.persistence.criteria.CriteriaQuery cq getEntityManager().getCriteriaBuilder().createQuery();
cq.select(cq.from(entityClass));
javax.persistence.Query q = getEntityManager().createQuery(cq);
q.setMaxResults(range[1] - range[0]);
q.setFirstResult(range[0]);
return q.getResultList();
}
This session bean is created with a local interface since the EJB 3.0 implementation in WebLogic Server requires the use of a business interface.
- In the persistence.xml file, a trick worth keeping in mind here which may save you some pain later is to explicitly specify the JPA provider to use. This helps later on when you deploy the completed application to WebLogic Server, where the default JPA provider is Kodo/OpenJPA. This can be overridden at the WLS domain level, but setting it in persistence.xml within the application itself is an easy way to do it now.
<provider>org.eclipse.persistence.jpa.PersistenceProvider</provider>
For more details on changing the default JPA provider for a WLS domain, see here:
http://buttso.blogspot.com/2010/05/changing-default-jpa-provider-in.html
- With the EJB project now complete, the JSF pages can be generated for the application. In the Web project, this is done using the "JSF Pages from Entity Classes ..." wizard.

What this wizard generates is a set of JSF pages to represent each of the CRUD operations, a Controller ManagedBean to handle the various tasks required by each of the JSF view pages and the data interactions (with paging) and a EJB 3.1 @Stateless session bean to act as a session facade on the Widget entity.
The new EJB in WAR packaging option available with Java EE 6 is not yet available on WebLogic Server, so the first trick here is to change the Web project to use the session facade that has already been generated in the EJB project. This is possible because the NetBeans wizards generate the same underlying code for the session facade whether it is for an EJB specific project or as part of the JSF Pages for Entity Classes wizard.
Delete the session bean bean in the Web project, then adjust the JSF controller to use the local interface for the session bean in the EJB project:
//@EJB
//private sab.demo.widget.service.WidgetFacade ejbFacade;
@EJB
private sab.demo.widget.service.WidgetFacadeLocal ejbFacade;
Note that EJB 3.1 supports a No-Interface view of an EJB, which WebLogic Server doesn't yet support. So here we have changed the injection point to use the Local interface from our EJB project.
There is also a getFacade method which needs this simple type change as well:
//private WidgetFacade getFacade() {
private WidgetFacadeLocal getFacade() {
return ejbFacade;
}
- Delete the persistence.xml file generated within the Web project, since this will now be supplied with the EJB project.
- Modify the web.xml file and change the "version" attribute to be "2.5" to specify a valid version for WebLogic Server:
<web-app version="2.5" ... >
- Using the "New ..." wizard, add a WebLogic Deployment descriptor to the Web project, and specify a shared library reference to the JSF 2.0 shared library that WebLogic Server supplies.
<?xml version="1.0" encoding="UTF-8"?>
<weblogic-web-app>
<context-root>Widget</context-root>
<library-ref>
<library-name>jsf</library-name>
<specification-version>2.0</specification-version>
<implementation-version>1.0.0.0_2-0-2</implementation-version>
</library-ref>
</weblogic-web-app>
See the links for more details about JSF 2.0 and WebLogic Server, including instructions for how to deploy and reference the shared-library:
http://buttso.blogspot.com/2010/05/jsf-20-support-in-weblogic-server-1033.html
http://buttso.blogspot.com/2011/03/jsf-with-managed-beans-and-dependency.html
- Build the final application into an EAR file that is ready for deployment.


- To deploy a JSF 2.0 application to WebLogic Server, the JSF 2.0 shared-library must be deployed. See links referenced above for details on how to do this.
http://buttso.blogspot.com/2010/05/jsf-20-support-in-weblogic-server-1033.html
http://buttso.blogspot.com/2011/03/jsf-with-managed-beans-and-dependency.html
- To use JPA 2.0 with WebLogic Server, two optional libraries within the WebLogic Server installation must be placed into the classpath. This can be automated through the use of a SmartUpdate patch, or it can be performed manually by setting a PRE_CLASSPATH environment variable and specifying the required libraries before starting the WebLogic Server domain.
$ export PRE_CLASSPATH=/Users/sbutton/Java/wls-1035-dev/modules/com.oracle.jpa2support_1.0.0.0_2-0.jar:/Users/sbutton/Java/wls-1035-dev/modules/javax.persistence_1.0.0.0_2-0-0.jar
See the documentation for more details as needed:
http://download.oracle.com/docs/cd/E17904_01/web.1111/e13720/using_toplink.htm#CIHDJHHI
- The application is also using the Bean Validation specification which is not supplied with WebLogic Server 10.3.4. To ensure that the JSF 2.0 and JPA 2.0 implementation in TopLink can see the Bean Validation implementation and automatically enlist it's services, I added it as an additional library to the PRE_CLASSPATH environment variable:
$ export PRE_CLASSPATH=${PRE_CLASSPATH):/Users/sbutton/Java/glassfish-31/glassfish3/glassfish/modules/bean-validator.jar
Note here I am just referencing the library from a local GlassFish installation I have. I could copy this library out into a separate location or even download it independently and reference it. Call me lazy if you will ... :-)
- Start a WebLogic Server domain
- Using the WebLogic Console, configure the required datasource (jdbc/sample) to point at the Derby database and test to ensure it is working.
- Using the console, deploy the application.


With the application deployed, it can be tested to observe the JSF 2.0, JPA 2.0 and Bean Validation uses working on WebLogic Server.
For instance, create a new Widget and specify an incorrect email address. You'll see that JSF will automatically detect the invalid value based on the @Pattern constraint set on the Widget entity, and display the accompanying message as an error message on the page.

Correcting the email address value, the entry can be successfully be saved.

Looking at the stdout on the console where the WLS domain was started, the use of JPA 2.0 via EclipseLink and the automatic enlistment of the Bean Validation implementation can be seen in the lines below:
<May 16, 2011 3:58:26 PM CST> <Notice> <WebLogicServer> <BEA-000360> <Server started in RUNNING mode>
May 16, 2011 3:58:40 PM org.hibernate.validator.util.Version <clinit>
INFO: Hibernate Validator 4.1.0.Final
May 16, 2011 3:58:40 PM org.hibernate.validator.engine.resolver.DefaultTraversableResolver detectJPA
INFO: Instantiated an instance of org.hibernate.validator.engine.resolver.JPATraversableResolver.
<May 16, 2011 3:58:40 PM CST> <Notice> <EclipseLink> <BEA-2005000> <2011-05-16 15:58:40.781--ServerSession(1625943009)--EclipseLink, version: Eclipse Persistence Services - 2.1.3.v20110304-r9073>
<May 16, 2011 3:58:40 PM CST> <Notice> <EclipseLink> <BEA-2005000> <2011-05-16 15:58:40.782--ServerSession(1625943009)--Server: 10.3.5.0>
<May 16, 2011 3:58:41 PM CST> <Notice> <EclipseLink> <BEA-2005000> <2011-05-16 15:58:41.266--ServerSession(1625943009)--file:/Users/sbutton/Projects/Domains/wls1035/servers/AdminServer/tmp/_WL_user/Widget/qb0nwv/Widget-EJB.jar_Widget-EJBPU login successful>
If you forget to specify the JPA provider using the <provider> element in config.xml and deploy the application to a default WLS domain, then you may see the following error message when you try and access the application:

This exception indicates that an application is using the JPA 2.0 API, but WebLogic Server can't find a JPA 2.0 provider. This is the default condition of a WLS domain where the Kodo/Open JPA 1.0 provider is supplied at runtime.
This can be easily modified as described above by specifying an explicit <provider> value for EclipseLink (or Hibernate if you are using that) or by altering the default JPA provider at the domain level using the WebLogic Console:

Summary
It proved to be quite straight forward to take the Java EE 6 CRUD application generated by NetBeans and alter it slightly to deploy and run successfully on WebLogic Server 10.3.4, using it's JSF 2.0 and JPA 2.0 support.
16 March 2011
Tutorial: JSF 2.0 and JPA 2.0 with WebLogic Server using NetBeans
The NetBeans team have produced a new tutorial demonstrating using JSF 2.0, JPA 2.0 with WebLogic Server 10.3.4 and NetBeans 7.0. The application uses the JPA entity and JSF page generation wizards to quickly produce a working application based on a sample schema.
Developing an Enterprise Application for Oracle WebLogic Server
From the WebLogic Server perspective, this tutorial demonstrates some of the nice integration points NetBeans now has with WebLogic Server.
For instance, the tutorial shows how NetBeans discovers and presents the set of WebLogic Server supplied JSF shared-libraries to the developer to select from.

It shows the resulting automatic configuration of the weblogic deployment descriptor to reference the chosen shared library, and finally it shows the automatic deployment that of the selected JSF shared library that NetBeans performs if necessary.

This all goes to make the use of JSF with WebLogic Server very straight forward.
The tutorial also highlights the simple approach NetBeans exposes for developers to Enable JPA 2.0 on the target WebLogic Server domain that is being used for the application.

All together this is a tutorial well worth taking a look at and stepping through to look at the generated code and pages.
Developing an Enterprise Application for Oracle WebLogic Server
From the WebLogic Server perspective, this tutorial demonstrates some of the nice integration points NetBeans now has with WebLogic Server.
For instance, the tutorial shows how NetBeans discovers and presents the set of WebLogic Server supplied JSF shared-libraries to the developer to select from.

It shows the resulting automatic configuration of the weblogic deployment descriptor to reference the chosen shared library, and finally it shows the automatic deployment that of the selected JSF shared library that NetBeans performs if necessary.

This all goes to make the use of JSF with WebLogic Server very straight forward.
The tutorial also highlights the simple approach NetBeans exposes for developers to Enable JPA 2.0 on the target WebLogic Server domain that is being used for the application.

All together this is a tutorial well worth taking a look at and stepping through to look at the generated code and pages.
06 May 2010
Changing Default JPA Provider in WebLogic Server 10.3.3
WebLogic Server has been providing both OpenJPA/Kodo and EclipseLink as JPA providers since WLS 10.3.1.
Unless an explicit <provider>...</provider> is specifed in the persistence.xml file of a deployed application, WLS will use OpenJPA/Kodo by default.
With the release of WLS 10.3.3, we have now provided a way to change the default JPA provider at the domain level, allowing you to switch between OpenJPA/Kodo or EclipseLink as the default that WLS will use.
The default JPA provider setting is exposed via a new MBean: JPAMBean on the DomainMBean, and persists the configuration into the config.xml file.
To easiest way to change the default JPA provider it to use the console and select the desired provider value.
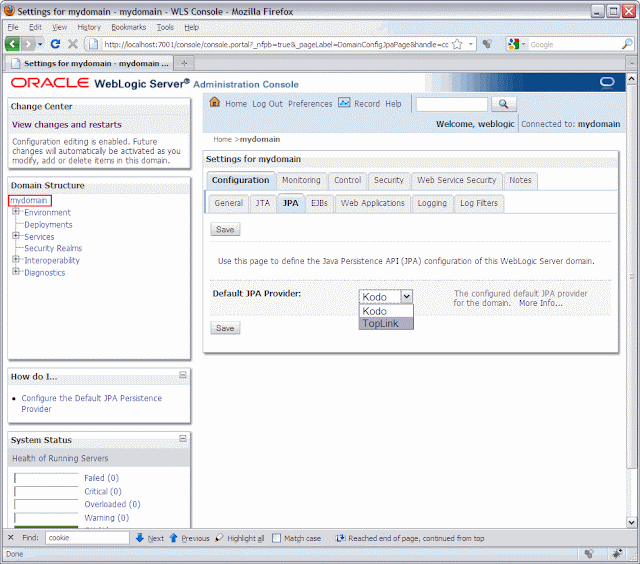
Unless an explicit <provider>...</provider> is specifed in the persistence.xml file of a deployed application, WLS will use OpenJPA/Kodo by default.
With the release of WLS 10.3.3, we have now provided a way to change the default JPA provider at the domain level, allowing you to switch between OpenJPA/Kodo or EclipseLink as the default that WLS will use.
The default JPA provider setting is exposed via a new MBean: JPAMBean on the DomainMBean, and persists the configuration into the config.xml file.
To easiest way to change the default JPA provider it to use the console and select the desired provider value.

13 October 2009
Exploring EclipseLink @OptimisticLocking
Been a while since I've had some fun with JPA, so I decided to spend a little time with it today.
I created a very simple domain model (Employee --> LeaveRecord) to use.

Since I was just intent of doing some quick testing, instead of following the usual route of creating an EJB session facade to expose the @Entity objects, and then exercising that from a client to test things out, I simply created some JUnit4 @Test cases to act as the test clients. These @Test cases exercised the @Entity objects from outside the container, so it was actually a very easy way to go.
One thing I'd never looked at much was the EclipseLink specific annotations, so I decided to take a quick peek around there for something interesting to test. A quick peruse of the EclipseLink documentation drew me to the @OptimisticLocking annotation. How could you not be optimistic with that!
The goal of the @OptimisticLocking annotation is to direct EclipseLink to use an optimistic locking strategy for the @Entity, directing it to the current property values from the object it is persisting against the data currently in the database to ensure it hasn't changed since it was last read.
There are several different options available, so I took a look at the differences between the OptimisticLockingType.ALL_COLUMNS and the OptimisticLockingType.CHANGED_COLUMNS options.
The @OptimisticLocking annotation is specified on the POJO.
  @Table(name = "EMPLOYEES")
  @OptimisticLocking(type=OptimisticLockingType.ALL_COLUMNS)
  public class Employee implements Serializable {
      ...
  }
Doing simple reads and updates of the Employee @Entity with the eclipselink.logging.level set to FINEST shows the SQL that is created when the different types are applied.
@OptimisticLocking(type=OptimisticLockingType.ALL_COLUMNS)
Connection(26174809)--UPDATE EMPLOYEES SET VACATION_HOURS = ?
  WHERE ((EMPLOYEE_ID = ?) AND
  (((((EMAIL_ADDRESS = ?) AND
      (FIRST_NAME = ?)) AND
      (LAST_NAME = ?)) AND
      (SALARY = ?)) AND
      (VACATION_HOURS = ?)))
   bind => [999, 1, jack.rooster@anon.org1, Jack1, Rooster1, 1.0, 1]
In this configuration, all the fields of the @Entity are contained in the WHERE clause of the UPDATE statement.
@OptimisticLocking(type=OptimisticLockingType.CHANGED_COLUMNS)
Connection(2554341)--UPDATE EMPLOYEES SET VACATION_HOURS = ?
  WHERE ((EMPLOYEE_ID = ?) AND (VACATION_HOURS = ?))
  bind => [999, 1, 1]
In this configuration, only the updated fields of the @Entity are contained in the WHERE clause of the UPDATE statement.
After testing the @OptimisticLocking annotation and observing that I worked as expected in my test environment, the next step was to test what happens when a change is made to an object after it has been read, but before it is updated.
The flow is essentially this:
  T1 --> read employee 1
  T1 --> create and start T2
    T2 --> read employee 1
    T2 --> update employee 1
    T2 --> persist employee 1
  T1 --> update employee 1
  T1 --> persist employee 1  *expect OptimisticLockingException*
The @Test case below represents this sequence.
@Test(expected = RollbackException.class, timeout = 20000)
public void checkOptimisticLocking() throws Exception {

    Employee pre = employeePM.find(Employee.class, Long.valueOf(1));

    // do the separate thread update of the specified employee with value
    EmployeeTestOptimisticLockingHelper t =
        new EmployeeTestOptimisticLockingHelper(1L, -999L);

    t.start();
    t.join(10000);

    // Now do the local the update
    // should throw OptimisticLockException
    employeePM.getTransaction().begin();
    pre.setVacationHours(999L);
    employeePM.getTransaction().commit();
}
The EmployeeTestOptimisticLockingHelper is a separate class that is executed via another Thread. This allows it to perform the change using a separate EntityManager.
public class EmployeeTestOptimisticLockingHelper extends Thread {

    private Long id;
    private Long newval;

    public EmployeeTestOptimisticLockingHelper(Long id, Long newval) {
        this.id = id;
        this.newval = newval;
    }

    @Override
    public void run() {
        EntityManager em = null;
        try {
            em = Persistence.createEntityManagerFactory("CompanyUnit")
                            .createEntityManager();
            Employee emp = em.find(Employee.class, id);
            em.getTransaction().begin();
            emp.setVacationHours(newval);
            em.getTransaction().commit();
        } catch (Exception e) {
            e.printStackTrace();
        } finally {
            em.close();
            interrupt();
        }
    }
}
When this @Test is executed, it results in the following exception being thrown, demonstrating that the specified @OptimisticLocking model is working as expected.
[EL Finer]: 2009.10.13 14:54:43.796--ClientSession(14031599)--Connection(26174809)--rollback transaction
[EL Warning]: 2009.10.13 14:54:43.796--UnitOfWork(26953544)--javax.persistence.OptimisticLockException: Exception [EclipseLink-5006] (Eclipse Persistence Services - 1.0.2 (Build 20081024)): org.eclipse.persistence.exceptions.OptimisticLockException
Exception Description: The object [Employee 1 Jack1 Rooster1 jack.rooster@anon.org1 999 $1.0] cannot be updated because it has changed or been deleted since it was last read.
Class> sab.demo.company.domain.Employee Primary Key> [1]
 at org.eclipse.persistence.internal.sessions.RepeatableWriteUnitOfWork.commitToDatabase(RepeatableWriteUnitOfWork.java:480)
 at org.eclipse.persistence.internal.sessions.UnitOfWorkImpl.commitToDatabaseWithChangeSet(UnitOfWorkImpl.java:1330)
 at org.eclipse.persistence.internal.sessions.RepeatableWriteUnitOfWork.commitRootUnitOfWork(RepeatableWriteUnitOfWork.java:159)
 at org.eclipse.persistence.internal.sessions.UnitOfWorkImpl.commitAndResume(UnitOfWorkImpl.java:1002)
 at org.eclipse.persistence.internal.jpa.transaction.EntityTransactionImpl.commitInternal(EntityTransactionImpl.java:84)
 at org.eclipse.persistence.internal.jpa.transaction.EntityTransactionImpl.commit(EntityTransactionImpl.java:63)
 at sab.demo.testdomains.EmployeeTest.checkOptimisticLocking(EmployeeTest.java:149)
And the JUnit runner shows the @Test passes as expected, since it is configred to expect the wrapper javax.persistence.RollbackException to occur.

Subscribe to:
Posts (Atom)