10 November 2006

Deploying a WAR File to OC4J From the Command Line

Building on the previous posting on deploying an EAR file to OC4J from the command line, this posting shows how to deploy a WAR file to an OC4J instance from the command line.

  1. Verify that you have the correct details to connect to the OC4J instance using the validateURI command.

    >java -jar admin_client.jar deployer:oc4j:localhost oc4jadmin -validateURI

    URI deployer:oc4j:localhost is valid and connected

  2. Use the deploy command to deploy the WAR file and bind it with a context-root path to the default web site.


    >java -jar admin_client.jar deployer:oc4j:localhost
    oc4jadmin <password>
    -deploy -file <path-to-war-file>
    -deploymentName <application name>
    -bindAllWebApps
    -contextRoot </path>

For example:

>java -jar admin_client.jar deployer:oc4j:localhost oc4jadmin <password> -deploy -file d:\temp\testit.war -deploymentName testit -bindAllWebApps -contextRoot "/testit"

06/11/13 11:39:20 Notification ==>Uploading file testit.war ...
06/11/13 11:39:20 Notification ==>Application Deployer for testit STARTS.
06/11/13 11:39:20 Notification ==>Undeploy previous deployment
06/11/13 11:39:21 Notification ==>Initialize C:\oc4j\j2ee\home\applications\testit.ear begins...
06/11/13 11:39:21 Notification ==>Initialize C:\oc4j\j2ee\home\applications\testit.ear ends...
06/11/13 11:39:21 Notification ==>Starting application : testit
06/11/13 11:39:21 Notification ==>Initializing ClassLoader(s)
06/11/13 11:39:21 Notification ==>Initializing EJB container
06/11/13 11:39:21 Notification ==>Loading connector(s)
06/11/13 11:39:21 Notification ==>Starting up resource adapters
06/11/13 11:39:21 Notification ==>Initializing EJB sessions
06/11/13 11:39:21 Notification ==>Committing ClassLoader(s)
06/11/13 11:39:21 Notification ==>Initialize testit begins...
06/11/13 11:39:21 Notification ==>Initialize testit ends...
06/11/13 11:39:21 Notification ==>Started application : testit
06/11/13 11:39:21 Notification ==>Binding web application(s) to site default-web-site begins...
06/11/13 11:39:21 Notification ==>Binding web application(s) to site default-web-site ends...
06/11/13 11:39:21 Notification ==>Application Deployer for testit COMPLETES.
Operation time: 1101 msecs


If you don't specify the -contextRoot switch, the WAR file will be bound to the default web site using the deploymentName that was specified.

Deploying an EAR File to OC4J From the Command Line

This is a posting which covers a very basic, but frequent operation with OC4J -- deploying an EAR file and automatically binding the web modules it contains to the default web site.

To do this, you use the OC4J command line utility admin_client.jar.
  1. Open a shell/command window

  2. Navigate to the $ORACLE_HOME/j2ee/home directory

  3. Make sure you can run the Java executable, either with it in the $PATH or via an absolute reference

    >java -version

    java version "1.5.0_07"
    Java(TM) 2 Runtime Environment, Standard Edition (build 1.5.0_07-b03)
    Java HotSpot(TM) Client VM (build 1.5.0_07-b03, mixed mode)

  4. Calculate the Deployer URI you need to use.

    The target OC4J instance is specified using a Deployment URI.

    For an OC4J standalone instance this takes the form:

    deployer:oc4j::

    deployer:oc4j:localhost:23791

    It defaults to using a port value 23791 so that can be omitted if the target port is 23791.

    For an Oracle Application Server OC4J instance, this takes form:

    deployer:oc4j:opmn://:/

    deployer:oc4j:opmn://localhost:6003/home

    This pattern defaults to using an OPMN request port value of 6003 so that can be omitted if the target port is 6003

    For an Oracle Application Server Cluster Group this takes form:

    deployer:cluster:opmn://
    :/

    deployer:cluster:opmn://localhost:6003/colors

    Again this pattern defaults to using an OPMN request port value of 6003 so that can be omitted if the target port is 6003

  5. Verify that you have the correct details to connect to the OC4J instance using the validateURI command.

    >java -jar admin_client.jar deployer:oc4j:localhost oc4jadmin -validateURI

    URI deployer:oc4j:localhost is valid and connected

  6. Use the deploy command to deploy the EAR file and bind the web modules it contains to the default web site.

    >java -jar admin_client.jar deployer:oc4j:localhost oc4jadmin -deploy -file -deploymentName -bindAllWebApps

    For example:

    >java -jar admin_client.jar deployer:oc4j:localhost oc4jadmin welcome1
    -deploy -file d:\temp\archer.ear -deploymentName archer -bindAllWebApps

    06/11/10 14:54:49 Notification ==>Uploading file archer.ear ...
    06/11/10 14:54:49 Notification ==>Application Deployer for archer STARTS.
    06/11/10 14:54:49 Notification ==>Copy the archive to c:\oc4j\j2ee\home\applications\archer.ear
    06/11/10 14:54:49 Notification ==>Initialize C:\oc4j\j2ee\home\applications\archer.ear begins...
    06/11/10 14:54:49 Notification ==>Unpacking archer.ear
    06/11/10 14:54:49 Notification ==>Done unpacking archer.ear
    06/11/10 14:54:49 Notification ==>Unpacking archer_web.war
    06/11/10 14:54:49 Notification ==>Done unpacking archer_web.war
    06/11/10 14:54:49 Notification ==>Initialize C:\oc4j\j2ee\home\applications\archer.ear ends...
    06/11/10 14:54:49 Notification ==>Starting application : archer
    06/11/10 14:54:49 Notification ==>Initializing ClassLoader(s)
    06/11/10 14:54:49 Notification ==>Initializing EJB container
    06/11/10 14:54:51 Notification ==>Loading connector(s)
    06/11/10 14:54:51 Notification ==>Starting up resource adapters
    06/11/10 14:54:51 Notification ==>Initializing EJB sessions
    06/11/10 14:54:51 Notification ==>Committing ClassLoader(s)
    06/11/10 14:54:51 Notification ==>Initialize archer_web begins...
    06/11/10 14:54:51 Notification ==>Initialize archer_web ends...
    06/11/10 14:54:51 Notification ==>Started application : archer
    06/11/10 14:54:51 Notification ==>Binding web application(s) to site default-web-site begins...
    06/11/10 14:54:51 Notification ==>Binding archer_web web-module for application archer to site default-web-site under context root /archer
    06/11/10 14:54:51 Notification ==>Binding web application(s) to site default-web-site ends...
    06/11/10 14:54:51 Notification ==>Application Deployer for archer COMPLETES.
    Operation time: 1933 msecs

And that is the most basic deployment operation in action.

You can do a lot more with this command, explore all its options using

>java -jar admin_client.jar -usage deploy


08 November 2006

Viewing JSP Stack Traces with OC4J 10.1.3.1.

You may notice a slight change in the behaviour of OC4J 10.1.3.1 with the JSP engine.

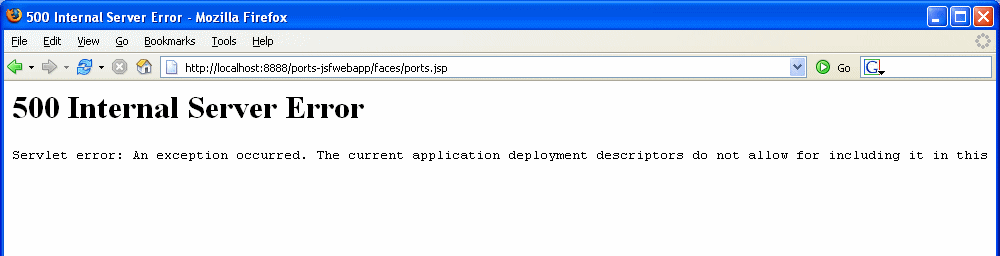
In previous releases, when an error occurs in the translation or runtime execution of a JSP page, the container would return the exception, message and a stacktrace to the client. It even included the line in the JSP page where the error occurred.

When developing, this rock'd. What more could you want -- error, stacktrace, offending line in JSP.

In the 10.1.3.1 release, the behaviour has changed so that instead of returning all the gory details to the client, a generic error message is presented. The details are now written into the log file for the application.


When running a production app, this is better -- clients don't need to see that level of detail.

The good news for developers is that the behaviour can be modified so that the error details are again reported to the client by configuring the web module to be in development mode.

This is done using the orion-web.xml of the application by setting the developer attribute of the orion-web-app element to true.

This can be done in several ways.

First off, you can put an orion-web.xml file into the WEB-INF directory of the Web module, and provide this setting in the file.

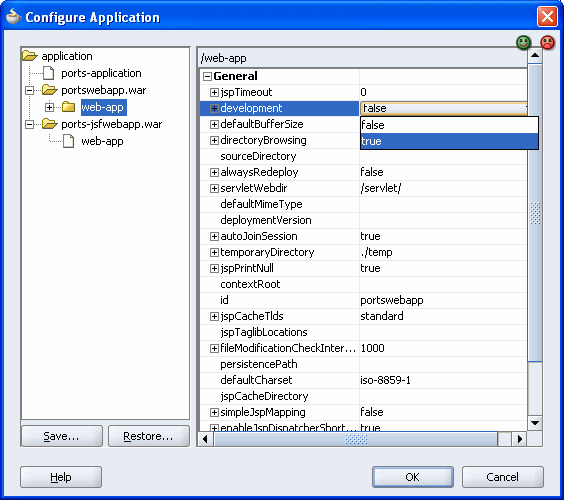
If you don't want to do that, and deploy the application using Application Server Control (ASC) then you can edit the deployment plan when the application is deployed and configure the development mode . Choose to edit the deployment plan, locate the Web module in question and set developer attribute to true.

If you are using JDeveloper and deploying the application to an external OC4J instance (ie not its embedded server), then you can use the Deployment Plan editor that it invokes to do the exact same thing. It's actually a really sweet capability.

When the deployment plan editor appear, locate for the Web module for which you want to enable development mode, then click in the "development" field and set the value to true.

Continue with the deployment.

This deployment plan setting will be applied to the application when it is deployed to the OC4J instance.

Now when the application is accessed and an error occurs, OC4J will determine that the Web module is running in development mode and return all the gory details to the client.


From the JDeveloper Deployment Plan editor, you can even choose to save the settings after you configure them so they can be loaded next time.

EAR File Packaging Got Better With JDeveloper 10.1.3.1

I'll admit it. I've been using Eclipse a lot more lately than JDeveloper. The main reason is that I find I struggle with the project and packaging model JDeveloper uses. For example, if I am building an example of using MBeans for an application, I've struggled to get it all packaged up nicely with JDeveloper in the past.

It could well be my fault by being a bit lazy and not really taking the time to understand the way it works. It just seemed easier to use Eclipse and built exactly what I wanted in Ant.

To cut a long story even remotely short, I just downloaded the new JDeveloper 10.1.3.1 distribution to verify a bug someone had pointed me at relating to defining MBeans in the orion-application.xml file.

As I started to use it, I noticed that it had improved quite a bit in the area of packaging EAR files. Certainly in the way I'd wanted to use it in the past.

One very nice thing is that it's now possible to specify in an EAR deployment-profile where a JAR file should be located within the EAR file. This is particularly helpful with the new JEE5 /lib classloading feature we've added.

For example, lets say you are building an application that consists of a Web application and an MBean. Typically you'd build the MBean as one project, and the Web module as another project.

Then assemble them into an EAR file using the EAR file deployment descriptor.

You may choose to create a specific project just to contain the EAR/application level artifacts such as application.xml -- there's a nice JDeveloper feature (that I think is new) here too where the entries in application.xml are automatically provided based on the J2EE modules selected to be in the application using the Application Assembly dialog page.

The example on the left shows an application called "example" that contains three projects: mbean, webapp and application.

The mbean and webapp projects contains the code and resources that relate to their needs. They both contain their own deployment profile to package the project into its required archive form. The application project is used to assemble the application from the separate projects using an EAR deployment profile.

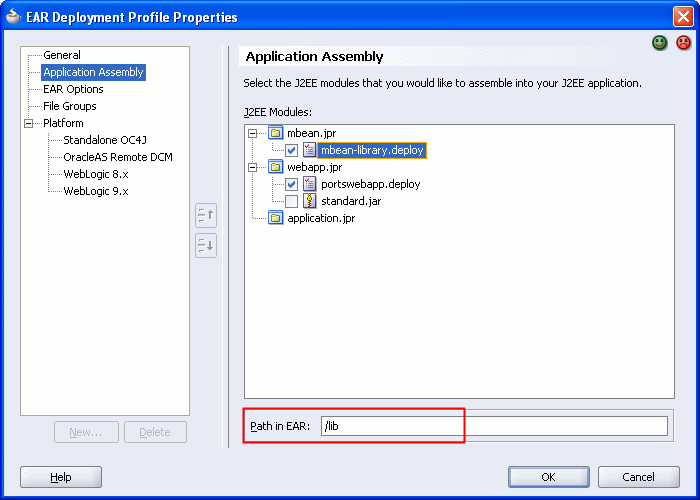
The EAR deployment profile lets the individual projects within the application to be assembled into the EAR file. The nice discovery I found in the 10.1.3.1. release is that the target directory within the EAR file can be specified now for each project.

Why is this exciting. Does Buttso have no life at all?

Well what I liked about it, is that you can use this new facility to make use of the JEE5 library-directory classloading addition. By specifying that the mbeans-library jar file should be placed within a /lib directory in the EAR file, the MBeans classes are automatically made avaialble to the other modules within the EAR file.

In reality to do this, you must also add an explicit J2EE deployment descriptor application.xml file inside of your EAR file instead of relying on the implicit application.xml file JDeveloper inserts into the EAR file.

Add a J2EE deployment descriptor application.xml file to the application project and either set the version to be "5" or if you leave it as a 1.4 version, insert the /lib tags into the file.

It's only a little feature for sure, but its certainly something that makes me more productive in JDeveloper than before. I'm hoping to discover a few other little things like this as I start to use it a little more often now.

07 November 2006

Using EAR Level Libraries with 10.1.3.1

In the classloading area, we've quietly added a new feature I think is pretty handy.

For a long while now, adding a library at the EAR file level, which is available to all the modules within the application has required the provision of a proprietary deployment descriptor.

To do it, you put the library into the EAR file, then declare it as a library by using an orion-application.xml file.
/EAR
/META-INF
orion-application.xml
application.xml
commonstuff.jar
webmodule.war
ejbmodule.jar

And in the orion-application.xml you'd have to put:
<orion-application>
<library path="commonstuff.jar"/>
...
</orion-application>

OK, it's not so much of a demanding task that its going to throw development schedules way out of kilter, but its just one of the little things you'd like to try and make a bit easier.

Well in 10.1.3.1 we have. The JEE5 specification calls for support for the inclusion of EAR level libraries. So we basically implement that with 10.1.3.1.

Given the example situation above, you can make commonstuff.jar automatically available to all the modules by simply putting it in a root level /lib directory of the EAR file and setting the version in the application.xml file to be "5".

<application version="5">
<module>
<ejb>ejb.modulejar</ejb>
</module>
</application>

If you want to use another directory name (instead of lib) then that can be specified using the <library-directory> tag.

<application version="5">
<library-directory>libraries</library-directory>
<module>
<ejb>ejb.modulejar</ejb>
</module>
</application>

In which case, the container will look for a /libraries directory inside of the EAR file for code sources to make available to the application.

It's not a massive feature change, but a nice little subtle one that helps to simplify the development and deployment cycle by removing the need to provide an orion-application.xml file with an application to share common libraries within the application itself.

Creating New OC4J Instances With 10.1.3.1

In the recently published OracleAS 10.1.3.1 release, you may notice that we've reintroduced support for a "Create Instance" operation within Application Server Control.

The "Create Instance" operation lets you create a new OC4J instance, give it a name and allocate it to a group. No surprises.

What may suprise you is that by default, the new OC4J instance is configured to run its default-web-site in AJP mode. What this means is that if you have performed the Basic Installation type and don't have Oracle HTTP Server in the mix, you can't access the new instance from a browser.

You can observe this using the command $ORACLE_HOME/opmn/bin/opmnctl status -l which outputs all the current ports in use for an Oracle Application Server home.

Processes in Instance: oow_http_admin.localhost
---------------------------------+--------------------+---------+----------+----
ias-component | process-type | pid | status |
uid | memused | uptime | ports
---------------------------------+--------------------+---------+----------+----
OC4JGroup:colors | OC4J:red | 3728 | Alive | 18
7892744 | 68052 | 0:09:09 | jms:12601,ajp:12502,rmis:12702,rmi:12402

But no worries, it's easy to change.

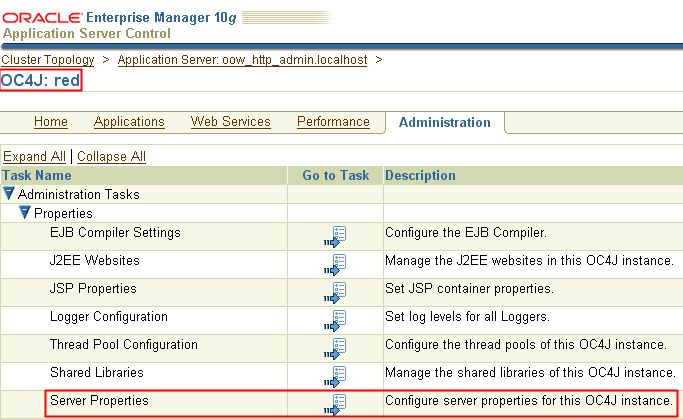
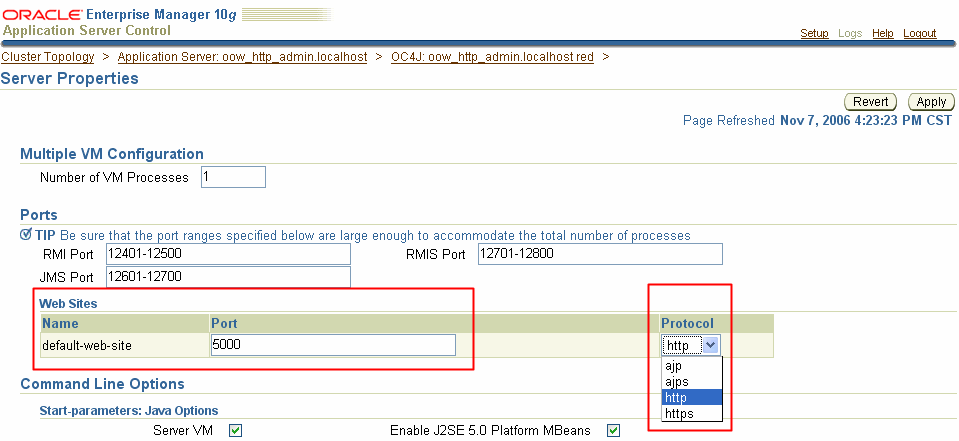
In the 10.1.3.1 release, we also added another new Adminstration Task to ASC to modify the "Server Properties" of an Oc4J instance. Using the "Server Properties" page you can change the protocol and port used by the default-web-site.


So what you want to do is to access the "Server Properties" page of the new OC4J instance and adjust the details of the default-web-suite so that it runs in HTTP mode using a known fixed (and free!) port.


After restarting the instance using OPMN or ASC, the new OC4J instance and applications deployed to it will be able to be accessed directly using a browser.

The "opmnctl status -l" show also now show the port being used as http:5000.

Processes in Instance: oow_http_admin.localhost
---------------------------------+--------------------+---------+----------+----
ias-component | process-type | pid | status |
uid | memused | uptime | ports
---------------------------------+--------------------+---------+----------+----
OC4JGroup:colors | OC4J:red | 6052 | Alive | 18
7892746 | 23260 | 0:00:34 | jms:12603,http:5000,rmis:12703,rmi:12403

28 August 2006

OTN Doc Search for Mozilla


Here's a search I use in Mozilla that enables me to do quick and easy searches of the Oracle Application Server 10.1.3 documentation set.

Create a new file in the $MOZILLA_HOME/searchplugins directory, paste in this text, and restart Mozilla.

You'll then see a new "OTN 10.1.3 Doc Search" box added to your search engines.

Type in a keyword press enter.

Bam!

Go on, search yourself silly.


OTN Doc Search
<search
version="1.0"
name="OTN 10.1.3 Doc Search"
description="OTN 10.1.3 Doc"
searchForm="http://www.oracle.com/pls/as1013/as1013.drilldown"
action="http://www.oracle.com/pls/as1013/as1013.drilldown"
method="GET" >

<input name="word" user>
<input name="remark" value="">
<input name="book" value="">
<input name="preference" value="">
<input name="method" value="TEXT">

<interpret
resultListStart="<!-- RESULT LIST START -->"
resultListEnd="<!-- RESULT LIST END -->"
resultItemStart="<!-- RESULT ITEM START -->"
resultItemEnd="<!-- RESULT ITEM END -->"
>
</search>


25 August 2006

Accessing Environment Variables from Oracle Application Server

Question of the day:

"We access and use standard environment variables in our Java code. It works with other vendors products, but when we deploy it to OC4J running within Oracle Application Server, the code no longer works. How can we use environment variables?"

Answer:

In the Oracle Application Server architecture, the OC4J process is started by the OPMN process. The model that is employed results in no environment variables that are set when OPMN is launched being passed to the processes that OPMN starts.

If you want to set specific environment variables for OPMN managed processes to use, then you must do it by setting the environment variable name and value in the opmn.xml file. OPMN will then pass the environment variable to the process(es) it starts.
  <ias-instanceid="ias-instance-id" ... ">
<environment>
<variableid="id" value="value" append="boolean"/>
</environment>
<ias-component id="ias-component-id">>
...
</ias-component id="ias-component-id">>
</ias-instanceid>
It's worth noting that the <environment> tag can be used in multiple places within the opmn.xml file to allow the correct scope (or additive effect) to be defined.

Once the environment variable has been set, it can be accessed from within an applictation running within an OPMN managed OC4J instance using the standard Java API: System.getenv("envvar");

01 August 2006

My Ant Discovery for the Day

I love it when I discover or learn something new. Or discover something I should probably already know.

I wanted to make an Ant build file conditional on the O/S on which is was executing - so a target copies either the .bat or .sh scripts into a runtime directory.

I started out thinking of using the inbuilt property ${os.name} -- which returns the O/S name. But with Windows having more flavours than Ben and Jerry, I was finding it hard just to deal with all the Windows flavours in their own right. In a neat manner anyway.

So Google with various keywords related to what I wanted to do returned this Gem of a task which has been added to Ant in recent times -- <os family="windows" /> -- when combined with a condition, it can be used to set a property if the O/S is any flavour of Windows. And then that can be used with the <target> conditional attributes.

Exactly what I wanted!

<!-- Set IsWindows property IF the OS is from the Windows family -->
<condition property="IsWindows" value="true">
<os family="windows" />
</condition>

And then use this in the O/S specific targets

<target name="copy-windows-scripts"if="IsWindows">
<echo message="Copying Windows scripts"/>
...
</target>

<target name="copy-linux-unix-scripts" unless="IsWindows">
<echo message="Copying Linux/Unix Scripts"/>
...
</target>

And then use these in the main task and they will be conditionally executed.

<!-- Either the .bat or .sh scripts will be copied based on the os family -->
<antcall target="copy-windows-scripts"/>
<antcall target="copy-linux-unix-scripts"/>

28 July 2006

Adding Oracle Ant Tasks to Eclipse

Whoa, a month since I last wrote anything. I'm not sure if that concerns me more from the point of view that I've not done anything interesting in a month which I thought was worth sharing, or that a month has flashed by so quickly.

Eclipse -> Ant -> OC4J

Mucking around with Eclipse lately, I wanted to use the <oracle:> Ant tasks from the IDE.

OC4J comes with its own standard Ant distribution which has the <oracle:> Ant tasks already seeded within it. One option therefore was to swap the distribution of Ant being used by Eclipse with the one in the OC4J distribution.

But that seemed a little severe -- how about we add the <oracle:> tasks to Eclipse instead.

After a bit of trial and a bit more of error, I have it working.

In the end, the steps required to make it work are quite simple, with one major consideration: it's necessary to have an OC4J environment local to the Eclipse IDE.

The <oracle:> Ant tasks are packaged to run within the context of OC4J. The Manifest.mf file of the JAR files contain Class-Path entries which define the other required libraries. So take it as a given, that as a minimum you need an OC4J environment on the client. This can be from the oc4j_extended.zip or from the result of performing an Oracle Application Server installation.

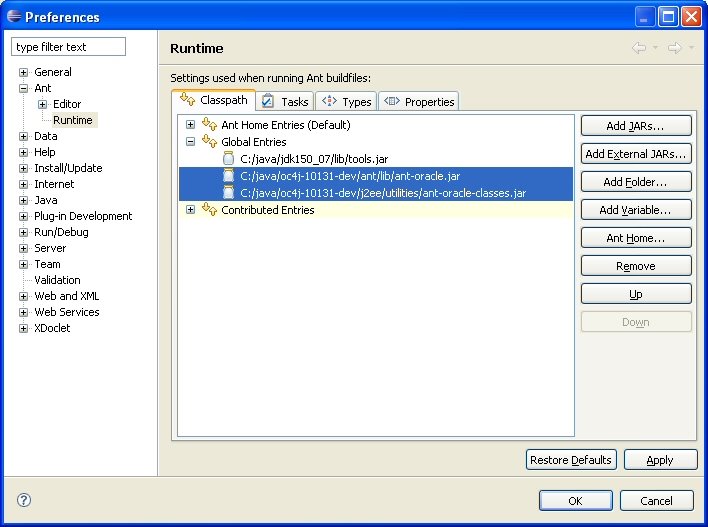
The two JAR files of interest from OC4J that we need to add to Eclipse are:

  1. ant/ant-oracle.jar
  2. j2ee/utilities/ant-oracle-classes.jar

Now when I say add, I mean configure the Eclipse Ant class-path to be aware of these JAR files in their original locations -- not copying them into the Ant directories within Eclipse. The JAR files have relative Class-Path links in their Manifest.mf files, so copying them around into different directories will break them.

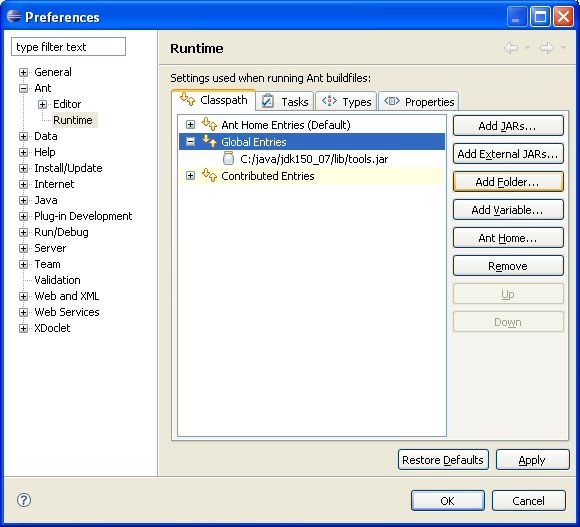
Once you have a Project, open the Windows -> Prefences dialog from the Menubar.


Select the Ant > Runtime node in the tree

Select the Classpath tab and the "Global Entries" node.

Click the "Add External JARS" button and add the two JAR files from the OC4J distribution.


That's it!

You can now define and use the <oracle*> Ant tasks within the Eclipse environment.

Here is an n example of using the <oracle:deploy> task to deploy an archive to an local OC4J instance.
<target name="deploy" depends="compile" description="--> description">
<oracle:deploy debug="true"
deployeruri="deployer:oc4j:localhost"
userid="oc4jadmin"
password="welcome1"
file="d:\temp\testit.war"
deploymentname="testit" contextroot="/testit"
bindallwebapps="default-web-site"/>
</target>
Executing this target from the Eclipse Ant runner results in the application being deployed to the specified OC4J instance.

Eclipse Content Assistance

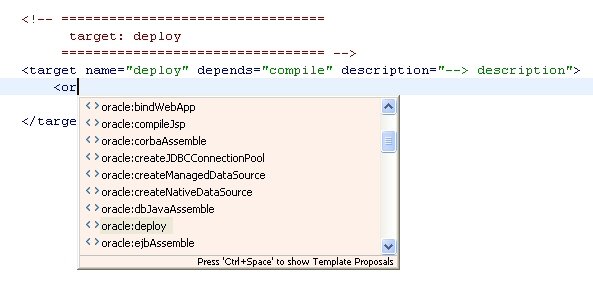
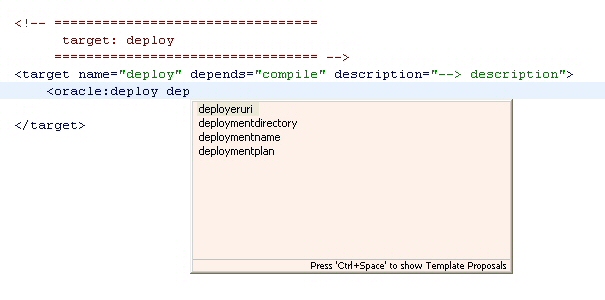
Once the <oracle> Ant tasks have been added, Eclipse can help you included them within build your Ant build files using its Content Assistance capability.

To see the list of <oracle> Ant tasks, simply type:

<ora> and press ctrl+space.

Eclipse will then display a list of all the <oracle:> tasks, which can be inserted into the build file by selecting the desired task.


Once the task has been inserted, the attributes for the task can be viewed using the same content assistance mechanism.


Note: I found that the Content Assistance would not show the <oracle:> tags until I added one manually. This seems to force Eclipse to load the JAR file and become aware of the rest of the tasks. This could just be my experience, but if the <oracle:> are not showing up in the IDE as described, try manually seeding it with the example I showed above.