23 November 2006

Hacking Eclipse WTP OC4J To Add Parent Attribute

A recent posting on the OTN OC4J forum asked whether it was possible to set the parent attribute of an application when it was deployed using the Eclipse WTP OC4J plugin.

The out-of-the-box plugin doesn't do it, but it's possible to add rudimentary support for it by editing a few of the plugins XML files.

You'll find the latest version of the plugin in the following directory: eclipse\plugins\org.eclipse.jst.server.generic.oc4j_1.5.0.v200606130315

What we need is to specify somewhere what the "parent" of the application being deployed is.

One way to do this is to edit oracle.10.1.3.serverdef file and add an additional property field that is shown in the server configuration dialog:
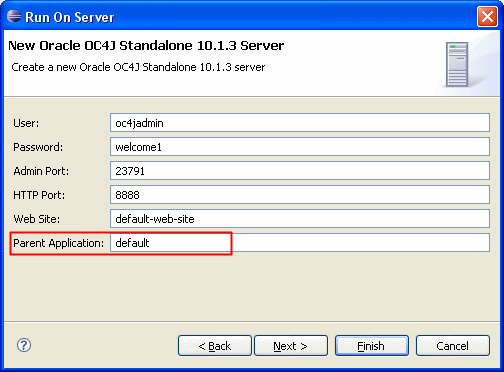
<property id="application.parent"
label="Parent Application:"
type="string"
context="server"
default="default" />
This addition results in the new property appearing on the OC4J server definition page:


The "Parent Application" property specified on the server defintion is then passed through to the Ant build file that performs the deployment.

Now by simply editing the oracle.10.1.3.xml file (which contains the deployment targets that are called by the plugin) the appplication.parent property can be appended to the deployment operation:
<target name="deploy.j2ee.ear" depends="check.skip.ear.deploy" unless="skip.deploy">
<antcall target="package.module.ear"/>
<oracle:deploy
deployerUri="${deployer.uri}"
userId="${oc4j.admin.user}"
password="${oc4j.admin.password}"
file="${server.publish.dir}/${module.name}.ear"
deploymentName="${module.name}"
bindAllWebApps="${oc4j.bind.website}"
parent="${application.parent}"/>
</target>
Now when a deployment is performed using this OC4J server definition, the parent property of the deployed application will be set to the value specified as shown in this snippet from the oc4j server.xml configuration file.
<application name="otn-parent-deploy-ear"
path="../applications\otn-parent-deploy-ear.ear"
parent="default" start="true" /
>
Its not the perfect solution since the parent value is specified at an OC4J server definition level and you can't specify the parent on an application-by-application basis. Which effectively means if you need to have different parent applications, you effecitvely need to create an OC4J server definition for each parent setting you need.

But if for some reason you really need to specify a specific parent value when deploying using the Eclipse WTP OC4J plugin, this is one way to accomodate it.

Test Code for OTN Question

http://forums.oracle.com/forums/thread.jspa?threadID=446801&tstart=0

SetSessionServlet:
    public void doGet(HttpServletRequest request,
HttpServletResponse response)
throws
ServletException, IOException {

response.setContentType(CONTENT_TYPE);

HttpSession session = request.getSession();
Date now = new Date(System.currentTimeMillis());
SimpleBean smb = null;

smb = (SimpleBean)session.getAttribute("when");
if (smb==null) {
smb = new SimpleBean();
}
smb.setId(session.getId());
smb.setWhen(now);
session.setAttribute("when", smb);
request.getRequestDispatcher("/index.jsp").forward(request, response);
}
index.jsp:
<!DOCTYPE HTML PUBLIC "-//W3C//DTD HTML 4.01 Transitional//EN"
"http://www.w3.org/TR/html4/loose.dtd">
<%@ page contentType="text/html;charset=windows-1252"%>
<html>
<head>
<meta http-equiv="Content-Type" content="text/html; charset=windows-1252"/>
<title>index</title>
</head>
<body>

<%
Object o = session.getAttribute("when");
if(o !=null) {
%>

When: <%=o%>

<%}
%>
<p>
<a href="setsessionservlet">Access the Servlet</a>
</p>
</body>
</html>
SimpleBean:
package oracle.otn.example;

import java.sql.Date;
import java.text.DateFormat;

public class SimpleBean {
private Date when;
private String id;
DateFormat df = DateFormat.getDateTimeInstance(DateFormat.LONG, DateFormat.LONG);

public SimpleBean() {
}

public String getId() {
return id;
}

public void setId(String id) {
this.id = id;
}


public Date getWhen() {
return when;
}

public void setWhen(Date when) {
this.when = when;
}

public String toString() {
return id + "::" + df.format(when);
}
}
This produces output such as the following on a series of requests:
When: 0abb70c7231c61d925be0b52462a8f04cf9600f3cff7::23 November 2006 12:15:47
When: 0abb70c7231c61d925be0b52462a8f04cf9600f3cff7::23 November 2006 12:15:58
When: 0abb70c7231c61d925be0b52462a8f04cf9600f3cff7::23 November 2006 12:16:07

20 November 2006

OC4J Administrator Password

As of the OC4J 10.1.3 release, there is no longer a "default" or out-of-the-box administrator password.

The password to be used for the administation user (oc4jadmin) is set when OC4J is first started.

If you are using OC4J standalone, you will be prompted for the password the very first time you start the OC4J instance.

If you are using Oracle Application Server, you would have been prompted for the password during the installation process that would have then been set for the OC4J instance.

If you use the "Create Instance" button to create a new OC4J instance within Application Server Control, the password will be inherited from the initial OC4J instance.

The password for the instance is encrypted and stored in the system-jazn-data.xml file.

Changing OC4J Ports in Oracle Application Server

When OC4J is part of an Oracle Application Server environment, it is managed and monitored OPMN. OPMN is a core component of Oracle Application Server and basically provides centralized process management capability.

As such, when OC4J is being managed by OPMN, the ports is uses at runtime are supplied by OPMN when it starts the instance. The port settings in the OC4J configuration files are overidden by the OPMN supplied values.

If OC4J ports need to be changed in an Oracle Application Server enviromment, then they need to be changed at the source -- the opmn.xml file -- and not in the OC4J configuration files.

There are three ways I can think of to change OPMN port entries

1. Use Application Server Control and the new Runtime Ports page that was added in the 10.1.3.1 release.

2. Use the opmnctl command

For example, to switch the default-web-site from using AJP to HTTP protocol, use this command:

>opmnctl config port update ias-component=OC4J process-type=home portid=default-web-site protocol=http

3. Manually edit opmn.xml and specify the port to use.

Now with that example, what needs to be kept in mind here is that for an Oracle Application Server installation, in most cases, the OC4J instance is running in AJP mode and Oracle HTTP Server is sitting in front of it and routing client requests.

If this is the case, and you want change the port to a value of 80, then you need to change the Oracle HTTP Server port since it is the server that is servicing end user requests and then routing them to OC4J. You don't change the OC4J port since it is servicing requests from Oracle HTTP Server.

Then just to make it a little confusing, the Oracle HTTP Server port is configured in $ORACLE_HOME/Apache/Apache/httpd.conf file and not in the opmn.xml file.

14 November 2006

Executing Scripts Using admin_client.jar

The command line utility admin_client.jar is used to perform deployment and other sorts of administrative operations against an OC4J instance.

Typically the operations are called from the command line on a one by one basis.

A little extra feature admin_client has is the ability to execute a script that contains a set of commands to perform.

Besides enabling scripts to be developed that capture a sequence of related (or common) operations, another benefit of this is that admin_client.jar establishes the connection once, and then executes the commands in the script using the same connection.

A script simply contains the list of admin_client commands to execute, in their normal form.

For example, to stop an application, then perform a redeployment, the script would contain:
  -stop  myApp
-redeploy -file d:\temp\myapp.ear -deploymentName myapp -bindAllWebApps

To execute the script, admin_client.jar is invoked as normal with the deployer_uri and the authentication details, but instead of providing a command to execute you specify the -script option and feed it the script to use.
C:\oc4j\j2ee\home>java -jar admin_client.jar
deployer:oc4j:localhost oc4jadmin welcome1 -script script.txt

06/11/15 20:53:00 Notification ==>Stopping manageable object:
oc4j:j2eeType=J2EEApplication,name=myapp,J2EEServer=standalone
06/11/15 20:53:00 Notification ==>Stop completed for state manageable object:
oc4j:j2eeType=J2EEApplication,name=myapp,J2EEServer=standalone
06/11/15 20:53:01 Notification ==>Uploading file myapp.ear ...
06/11/15 20:53:01 Notification ==>Application Deployer for myapp STARTS.
...


Related documentation.

13 November 2006

Starting and Stopping Applications On OC4J

A handy but little known feature with OC4J 10.1.3 is the ability to selectively start and stop applications that are deployed to an OC4J instance.

In previous releases, it was always possible to start/stop an OC4J instance, but it wasn't possible to start/stop the individual applications that are deployed to an OC4J instance.

The application start/stop operations are exposed in multiple places.

  1. Within Application Server Control

    This is relatively straight forward, so I'll leave it to you to play with.

  2. Within admin_client.jar

    Stop operation:
    >java -jar admin_client.jar
    deployer:oc4j:localhost oc4jadmin [password] -stop myApp

    Notification ==>Stopping manageable object:
    oc4j:j2eeType=J2EEApplication,name=myAppJ2EEServer=standalone

    Notification ==>Stop completed for state manageable object:
    oc4j:j2eeType=J2EEApplication,name=myApp,J2EEServer=standalone

    The new state of the application is written in the server.xml file:
    <application name="myApp" path="../applications/myApp.ear"
    parent="default" start="false" />

    Start operation:
    >java -jar admin_client.jar
    deployer:oc4j:localhost oc4jadmin [password] -start myApp

    Notification ==>Starting manageable object:
    oc4j:j2eeType=J2EEApplication,name=myAppJ2EEServer=standalone

    Notification ==>Start completed for state manageable object:
    oc4j:j2eeType=J2EEApplication,name=myApp,J2EEServer=standalone

    <application name="myApp" path="../applications/myApp.ear"
    parent="default" start="true" />

  3. Using the Oracle Ant tasks <oracle:stop> and <oracle:start>

    Stop operation:
    <target name="stopapp">
    <echo message="-----> Stopping application" />
    <oracle:stop
    deployerUri="deployer:oc4j:localhost"
    userid="oc4jadmin" password="welcome1"
    deploymentName="myApp"
    />
    </target>

    Buildfile: build.xml

    stopapp:
    [echo] -----> Stopping application
    [oracle:stop] Stopping application testpermgen.
    [oracle:stop] 06/11/14 15:42:45 Notification ==>
    Stop completed for state manageable object:
    oc4j:j2eeType=J2EEApplication,name=myApp,J2EEServer=standalone

    And the same pattern for the start operation.
    <target name="startapp">
    <echo message="-----> Starting application" />
    <oracle:start
    deployerUri="deployer:oc4j:localhost"
    userid="oc4jadmin" password="welcome1"
    deploymentName="myApp"
    />
    </target>

    Buildfile: build.xml

    startapp:
    [echo] -----> startping application
    [oracle:start] Starting application myApp.

    [oracle:start] 06/11/14 15:47:48 Notification ==>
    Starting manageable object:
    oc4j:j2eeType=J2EEApplication,name=myApp,J2EEServer=standalone

    [oracle:start] 06/11/14 15:47:48 Notification ==>
    Start completed for state manageable object:
    oc4j:j2eeType=J2EEApplication,name=myApp,J2EEServer=standalone

    [oracle:start] Application myApp started.
You can now have multiple applications all deployed to an OC4J instance and only start those applications you need at any point in time.

Tip on Deploying to Oracle Application Server Using admin_client.jar

When using admin_client.jar to operate against an Oracle Application Server instance, the deployer_uri takes the form:

deployer:oc4j:opmn://opmn-host:opmn-request-port/oc4j-instance-name

which commonly translates into something like

deployer:oc4j:opmn://localhost:6003/home

or even

deployer:oc4j:opmn://localhost/home

Note that in the last realized form, the opmn-request-port is left off, so the port will default to 6003.

When its operating against Oracle Application Server, admin_client.jar uses the OPMN request port to determine what the exact network location is for the OC4J instance that is specified.

If you find you are running into an error that states "Failed at Could not get DeploymentManager", then its well worth double checking what the actual OPMN request port actually is.

This can be done in three ways I can think of:

1. From the command line using the opmnctl command

C:\oracleas\opmn\bin>opmnctl status -port
127.0.0.1:6005

2. By looking at the $ORACLE_HOME/opmn/conf/opmn.xml and looking for the value of the defined request attribute in the port tag:


3. And finally, with the 10.1.3.1 release, you can use Application Server Control (ASC) to display the port values of the OPMN service. On the Cluster Topology page, scroll down to the bottom and click the Runtime Ports link. This will display all of the ports currently in use by the server, including the OPMN service.


Once you have the OPMN request port, if it differs from 6003 then ensure that you use the correct value with the deployer_uri so that admin_client can connect to the OPMN service.

For example, given the information above, a valid deployer URL would be:

deployer:oc4j:opmn://localhost:6005/admin

Which can be validated as accurate:

C:\oracleas\j2ee\home>java -jar admin_client.jar
deployer:oc4j:opmn://localhost:6005/admin oc4jadmin welcome1 -validateURI

URI deployer:oc4j:opmn://localhost:6005/admin is valid and connected


10 November 2006

How to Set Java Options For OC4J

OC4J runs in two different environments -- OC4J standalone and Oracle Application Server -- it's the same OC4J, but how it's started is different.

Setting Java properties for the OC4J instance is therefore done in a slightly different way.

1. An OC4J standalone environment is created by extracting the contents of the oc4j_extended.zip file. This gives you an simple yet complete OC4J environment.

To start OC4J standalone, you call the Java executable yourself and run the oc4j.jar file.

Thus in this sort of environment, you provide the Java properties (-X, -D) on the command line

>java -Xmx256m -Ddebug.log=true -jar oc4j.jar

2. In an Oracle Application Server environment, an OC4J instance is launched (and monitored/stopped) by the OPMN service.

The OPMN service reads a configuration file $ORACLE_HOME/opmn/conf/opmn.xml that defines what processes OPMN needs to start, and also what environment needs to be supplied to the process.

The Java properties for an OC4J instance are defined within its start-parameters/java-options tag in its opmn.xml definition.
<process-type id="admin" module-id="OC4J" status="enabled">
<module-data>
<category id="start-parameters">
<data id="java-options"
value="-Xrs -server -XX:MaxPermSize=128M
-ms512M -mx1024M -XX:AppendRatio=3
-Djava.awt.headless=true
-Dhttp.webdir.enable=false"
/>
</category>
<category id="stop-parameters">
<data id="java-options"
value="-Djava.awt.headless=true -Dhttp.webdir.enable=false"/>
</category>
</module-data>
<start timeout="600" retry="2"/>
<stop timeout="120"/>
<restart timeout="720" retry="2"/>
<port id="default-web-site" range="12501-12600" protocol="ajp"/>
<port id="rmi" range="12401-12500"/>
<port id="rmis" range="12701-12800"/>
<port id="jms" range="12601-12700"/>
<process-set id="default_group" numprocs="1"/>
</process-type>
To add extra Java options, this opmn.xml file can be modified to set the additional property values required. Don't forget to take a backup first.

Once you change the file, execute the command below to request OPMN to reload the configuration file into memory:

>$ORACLE_HOME/opmn/bin/opmnctl reload

and then start the OC4J instance.


As of the Oracle Application Server 10g R3 (10.1.3.1) release, the Java options for an Oc4J instance can be set directly from Application Server Control console.

No need to manually edit the opmn.xml file.

The Start Parameters:Java Options settings can be accessed using the Server Properties page of the OC4J instance you wish to configure.

Deploying a WAR File to OC4J From the Command Line

Building on the previous posting on deploying an EAR file to OC4J from the command line, this posting shows how to deploy a WAR file to an OC4J instance from the command line.

  1. Verify that you have the correct details to connect to the OC4J instance using the validateURI command.

    >java -jar admin_client.jar deployer:oc4j:localhost oc4jadmin -validateURI

    URI deployer:oc4j:localhost is valid and connected

  2. Use the deploy command to deploy the WAR file and bind it with a context-root path to the default web site.


    >java -jar admin_client.jar deployer:oc4j:localhost
    oc4jadmin <password>
    -deploy -file <path-to-war-file>
    -deploymentName <application name>
    -bindAllWebApps
    -contextRoot </path>

For example:

>java -jar admin_client.jar deployer:oc4j:localhost oc4jadmin <password> -deploy -file d:\temp\testit.war -deploymentName testit -bindAllWebApps -contextRoot "/testit"

06/11/13 11:39:20 Notification ==>Uploading file testit.war ...
06/11/13 11:39:20 Notification ==>Application Deployer for testit STARTS.
06/11/13 11:39:20 Notification ==>Undeploy previous deployment
06/11/13 11:39:21 Notification ==>Initialize C:\oc4j\j2ee\home\applications\testit.ear begins...
06/11/13 11:39:21 Notification ==>Initialize C:\oc4j\j2ee\home\applications\testit.ear ends...
06/11/13 11:39:21 Notification ==>Starting application : testit
06/11/13 11:39:21 Notification ==>Initializing ClassLoader(s)
06/11/13 11:39:21 Notification ==>Initializing EJB container
06/11/13 11:39:21 Notification ==>Loading connector(s)
06/11/13 11:39:21 Notification ==>Starting up resource adapters
06/11/13 11:39:21 Notification ==>Initializing EJB sessions
06/11/13 11:39:21 Notification ==>Committing ClassLoader(s)
06/11/13 11:39:21 Notification ==>Initialize testit begins...
06/11/13 11:39:21 Notification ==>Initialize testit ends...
06/11/13 11:39:21 Notification ==>Started application : testit
06/11/13 11:39:21 Notification ==>Binding web application(s) to site default-web-site begins...
06/11/13 11:39:21 Notification ==>Binding web application(s) to site default-web-site ends...
06/11/13 11:39:21 Notification ==>Application Deployer for testit COMPLETES.
Operation time: 1101 msecs


If you don't specify the -contextRoot switch, the WAR file will be bound to the default web site using the deploymentName that was specified.

Deploying an EAR File to OC4J From the Command Line

This is a posting which covers a very basic, but frequent operation with OC4J -- deploying an EAR file and automatically binding the web modules it contains to the default web site.

To do this, you use the OC4J command line utility admin_client.jar.
  1. Open a shell/command window

  2. Navigate to the $ORACLE_HOME/j2ee/home directory

  3. Make sure you can run the Java executable, either with it in the $PATH or via an absolute reference

    >java -version

    java version "1.5.0_07"
    Java(TM) 2 Runtime Environment, Standard Edition (build 1.5.0_07-b03)
    Java HotSpot(TM) Client VM (build 1.5.0_07-b03, mixed mode)

  4. Calculate the Deployer URI you need to use.

    The target OC4J instance is specified using a Deployment URI.

    For an OC4J standalone instance this takes the form:

    deployer:oc4j::

    deployer:oc4j:localhost:23791

    It defaults to using a port value 23791 so that can be omitted if the target port is 23791.

    For an Oracle Application Server OC4J instance, this takes form:

    deployer:oc4j:opmn://:/

    deployer:oc4j:opmn://localhost:6003/home

    This pattern defaults to using an OPMN request port value of 6003 so that can be omitted if the target port is 6003

    For an Oracle Application Server Cluster Group this takes form:

    deployer:cluster:opmn://
    :/

    deployer:cluster:opmn://localhost:6003/colors

    Again this pattern defaults to using an OPMN request port value of 6003 so that can be omitted if the target port is 6003

  5. Verify that you have the correct details to connect to the OC4J instance using the validateURI command.

    >java -jar admin_client.jar deployer:oc4j:localhost oc4jadmin -validateURI

    URI deployer:oc4j:localhost is valid and connected

  6. Use the deploy command to deploy the EAR file and bind the web modules it contains to the default web site.

    >java -jar admin_client.jar deployer:oc4j:localhost oc4jadmin -deploy -file -deploymentName -bindAllWebApps

    For example:

    >java -jar admin_client.jar deployer:oc4j:localhost oc4jadmin welcome1
    -deploy -file d:\temp\archer.ear -deploymentName archer -bindAllWebApps

    06/11/10 14:54:49 Notification ==>Uploading file archer.ear ...
    06/11/10 14:54:49 Notification ==>Application Deployer for archer STARTS.
    06/11/10 14:54:49 Notification ==>Copy the archive to c:\oc4j\j2ee\home\applications\archer.ear
    06/11/10 14:54:49 Notification ==>Initialize C:\oc4j\j2ee\home\applications\archer.ear begins...
    06/11/10 14:54:49 Notification ==>Unpacking archer.ear
    06/11/10 14:54:49 Notification ==>Done unpacking archer.ear
    06/11/10 14:54:49 Notification ==>Unpacking archer_web.war
    06/11/10 14:54:49 Notification ==>Done unpacking archer_web.war
    06/11/10 14:54:49 Notification ==>Initialize C:\oc4j\j2ee\home\applications\archer.ear ends...
    06/11/10 14:54:49 Notification ==>Starting application : archer
    06/11/10 14:54:49 Notification ==>Initializing ClassLoader(s)
    06/11/10 14:54:49 Notification ==>Initializing EJB container
    06/11/10 14:54:51 Notification ==>Loading connector(s)
    06/11/10 14:54:51 Notification ==>Starting up resource adapters
    06/11/10 14:54:51 Notification ==>Initializing EJB sessions
    06/11/10 14:54:51 Notification ==>Committing ClassLoader(s)
    06/11/10 14:54:51 Notification ==>Initialize archer_web begins...
    06/11/10 14:54:51 Notification ==>Initialize archer_web ends...
    06/11/10 14:54:51 Notification ==>Started application : archer
    06/11/10 14:54:51 Notification ==>Binding web application(s) to site default-web-site begins...
    06/11/10 14:54:51 Notification ==>Binding archer_web web-module for application archer to site default-web-site under context root /archer
    06/11/10 14:54:51 Notification ==>Binding web application(s) to site default-web-site ends...
    06/11/10 14:54:51 Notification ==>Application Deployer for archer COMPLETES.
    Operation time: 1933 msecs

And that is the most basic deployment operation in action.

You can do a lot more with this command, explore all its options using

>java -jar admin_client.jar -usage deploy


08 November 2006

Viewing JSP Stack Traces with OC4J 10.1.3.1.

You may notice a slight change in the behaviour of OC4J 10.1.3.1 with the JSP engine.

In previous releases, when an error occurs in the translation or runtime execution of a JSP page, the container would return the exception, message and a stacktrace to the client. It even included the line in the JSP page where the error occurred.

When developing, this rock'd. What more could you want -- error, stacktrace, offending line in JSP.

In the 10.1.3.1 release, the behaviour has changed so that instead of returning all the gory details to the client, a generic error message is presented. The details are now written into the log file for the application.


When running a production app, this is better -- clients don't need to see that level of detail.

The good news for developers is that the behaviour can be modified so that the error details are again reported to the client by configuring the web module to be in development mode.

This is done using the orion-web.xml of the application by setting the developer attribute of the orion-web-app element to true.

This can be done in several ways.

First off, you can put an orion-web.xml file into the WEB-INF directory of the Web module, and provide this setting in the file.

If you don't want to do that, and deploy the application using Application Server Control (ASC) then you can edit the deployment plan when the application is deployed and configure the development mode . Choose to edit the deployment plan, locate the Web module in question and set developer attribute to true.

If you are using JDeveloper and deploying the application to an external OC4J instance (ie not its embedded server), then you can use the Deployment Plan editor that it invokes to do the exact same thing. It's actually a really sweet capability.

When the deployment plan editor appear, locate for the Web module for which you want to enable development mode, then click in the "development" field and set the value to true.

Continue with the deployment.

This deployment plan setting will be applied to the application when it is deployed to the OC4J instance.

Now when the application is accessed and an error occurs, OC4J will determine that the Web module is running in development mode and return all the gory details to the client.


From the JDeveloper Deployment Plan editor, you can even choose to save the settings after you configure them so they can be loaded next time.

EAR File Packaging Got Better With JDeveloper 10.1.3.1

I'll admit it. I've been using Eclipse a lot more lately than JDeveloper. The main reason is that I find I struggle with the project and packaging model JDeveloper uses. For example, if I am building an example of using MBeans for an application, I've struggled to get it all packaged up nicely with JDeveloper in the past.

It could well be my fault by being a bit lazy and not really taking the time to understand the way it works. It just seemed easier to use Eclipse and built exactly what I wanted in Ant.

To cut a long story even remotely short, I just downloaded the new JDeveloper 10.1.3.1 distribution to verify a bug someone had pointed me at relating to defining MBeans in the orion-application.xml file.

As I started to use it, I noticed that it had improved quite a bit in the area of packaging EAR files. Certainly in the way I'd wanted to use it in the past.

One very nice thing is that it's now possible to specify in an EAR deployment-profile where a JAR file should be located within the EAR file. This is particularly helpful with the new JEE5 /lib classloading feature we've added.

For example, lets say you are building an application that consists of a Web application and an MBean. Typically you'd build the MBean as one project, and the Web module as another project.

Then assemble them into an EAR file using the EAR file deployment descriptor.

You may choose to create a specific project just to contain the EAR/application level artifacts such as application.xml -- there's a nice JDeveloper feature (that I think is new) here too where the entries in application.xml are automatically provided based on the J2EE modules selected to be in the application using the Application Assembly dialog page.

The example on the left shows an application called "example" that contains three projects: mbean, webapp and application.

The mbean and webapp projects contains the code and resources that relate to their needs. They both contain their own deployment profile to package the project into its required archive form. The application project is used to assemble the application from the separate projects using an EAR deployment profile.

The EAR deployment profile lets the individual projects within the application to be assembled into the EAR file. The nice discovery I found in the 10.1.3.1. release is that the target directory within the EAR file can be specified now for each project.

Why is this exciting. Does Buttso have no life at all?

Well what I liked about it, is that you can use this new facility to make use of the JEE5 library-directory classloading addition. By specifying that the mbeans-library jar file should be placed within a /lib directory in the EAR file, the MBeans classes are automatically made avaialble to the other modules within the EAR file.

In reality to do this, you must also add an explicit J2EE deployment descriptor application.xml file inside of your EAR file instead of relying on the implicit application.xml file JDeveloper inserts into the EAR file.

Add a J2EE deployment descriptor application.xml file to the application project and either set the version to be "5" or if you leave it as a 1.4 version, insert the /lib tags into the file.

It's only a little feature for sure, but its certainly something that makes me more productive in JDeveloper than before. I'm hoping to discover a few other little things like this as I start to use it a little more often now.

07 November 2006

Using EAR Level Libraries with 10.1.3.1

In the classloading area, we've quietly added a new feature I think is pretty handy.

For a long while now, adding a library at the EAR file level, which is available to all the modules within the application has required the provision of a proprietary deployment descriptor.

To do it, you put the library into the EAR file, then declare it as a library by using an orion-application.xml file.
/EAR
/META-INF
orion-application.xml
application.xml
commonstuff.jar
webmodule.war
ejbmodule.jar

And in the orion-application.xml you'd have to put:
<orion-application>
<library path="commonstuff.jar"/>
...
</orion-application>

OK, it's not so much of a demanding task that its going to throw development schedules way out of kilter, but its just one of the little things you'd like to try and make a bit easier.

Well in 10.1.3.1 we have. The JEE5 specification calls for support for the inclusion of EAR level libraries. So we basically implement that with 10.1.3.1.

Given the example situation above, you can make commonstuff.jar automatically available to all the modules by simply putting it in a root level /lib directory of the EAR file and setting the version in the application.xml file to be "5".

<application version="5">
<module>
<ejb>ejb.modulejar</ejb>
</module>
</application>

If you want to use another directory name (instead of lib) then that can be specified using the <library-directory> tag.

<application version="5">
<library-directory>libraries</library-directory>
<module>
<ejb>ejb.modulejar</ejb>
</module>
</application>

In which case, the container will look for a /libraries directory inside of the EAR file for code sources to make available to the application.

It's not a massive feature change, but a nice little subtle one that helps to simplify the development and deployment cycle by removing the need to provide an orion-application.xml file with an application to share common libraries within the application itself.

Creating New OC4J Instances With 10.1.3.1

In the recently published OracleAS 10.1.3.1 release, you may notice that we've reintroduced support for a "Create Instance" operation within Application Server Control.

The "Create Instance" operation lets you create a new OC4J instance, give it a name and allocate it to a group. No surprises.

What may suprise you is that by default, the new OC4J instance is configured to run its default-web-site in AJP mode. What this means is that if you have performed the Basic Installation type and don't have Oracle HTTP Server in the mix, you can't access the new instance from a browser.

You can observe this using the command $ORACLE_HOME/opmn/bin/opmnctl status -l which outputs all the current ports in use for an Oracle Application Server home.

Processes in Instance: oow_http_admin.localhost
---------------------------------+--------------------+---------+----------+----
ias-component | process-type | pid | status |
uid | memused | uptime | ports
---------------------------------+--------------------+---------+----------+----
OC4JGroup:colors | OC4J:red | 3728 | Alive | 18
7892744 | 68052 | 0:09:09 | jms:12601,ajp:12502,rmis:12702,rmi:12402

But no worries, it's easy to change.

In the 10.1.3.1 release, we also added another new Adminstration Task to ASC to modify the "Server Properties" of an Oc4J instance. Using the "Server Properties" page you can change the protocol and port used by the default-web-site.


So what you want to do is to access the "Server Properties" page of the new OC4J instance and adjust the details of the default-web-suite so that it runs in HTTP mode using a known fixed (and free!) port.


After restarting the instance using OPMN or ASC, the new OC4J instance and applications deployed to it will be able to be accessed directly using a browser.

The "opmnctl status -l" show also now show the port being used as http:5000.

Processes in Instance: oow_http_admin.localhost
---------------------------------+--------------------+---------+----------+----
ias-component | process-type | pid | status |
uid | memused | uptime | ports
---------------------------------+--------------------+---------+----------+----
OC4JGroup:colors | OC4J:red | 6052 | Alive | 18
7892746 | 23260 | 0:00:34 | jms:12603,http:5000,rmis:12703,rmi:12403