09 May 2006

Springing into OC4J MBeans

I noticed a while back that Spring has a funky little mechanism by which it can export its beans as JMX MBeans.

Which pricked my attention since it meant that theoretically with OC4J 10.1.3, any Spring Beans which are configured as part of an application and exported as MBeans, could be accessed through Application Server Control using the Application MBean Browser. Giving developers the power to allow administrators to configure elements of their Spring based applications.

So I tried it out and found that it just bloody worked! Which blew me away. These standards we all operate on are a wonderful thing when they all come together.

Here's an example of a Spring configuration which defines a bean and injects some initial values for its properties:

<bean id="aussieGreetingService"
class="test.spring.beans.GreetingServiceImpl">
<property name="greeting" value="gday mate!"/>
<property name="language" value="Aussie"/>
</bean>

To make this bean configuration available as an MBean then you need to do two extra things in this configuration file.

1. Define a Spring bean which represents an MBeanServer

<bean id="greetingMbeanServer"
class="org.springframework.jmx.support.MBeanServerFactoryBean">
<property name="defaultDomain" value="GreetingService" />
</bean>

Note that this MBeanServer bean creates an MBeanServer using the specified defaultDomain -- this is injected as a property.

2. Specify which of the Spring beans should be exported as MBeans using the MBeanExport Spring bean.


<bean id="exporter"
class="org.springframework.jmx.export.MBeanExporter">
<property name="beans">
<map>
<entry key="bean:name=aussieGreetingService"
value-ref="aussieGreetingService" />
</map>
</property>
<property name="server" ref="greetingMbeanServer" />
</bean>

Note that the name of the MBeanServer in which the MBeans are to be created has to be provided -- and it points to the MBeanServer we created in Step 1.

The MBean will expose all of the relevant properties (JMX:attributes) of the JavaBean as well as the methods (jmx:operations) the JavaBean supports.

And now the cool thing -- if this configuration file is deployed as part of an application with the Spring framework libraries and the corresponding JavaBeans, then the Spring beans will be accessible as JMX MBeans using Application Server Control.

Viewing and setting JavaBean properties:


Viewing JavaBean methods:


Invoking a JavaBean method:
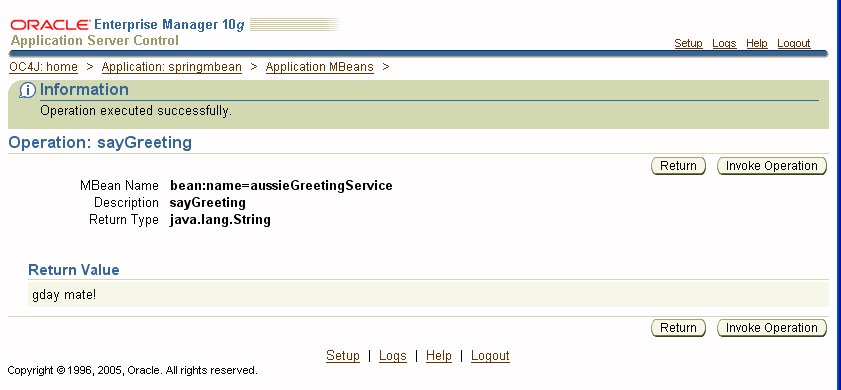


And there you have it -- managing Spring beans using JMX with Application Server Control.

03 May 2006

OC4J Virtual Directory Mapping

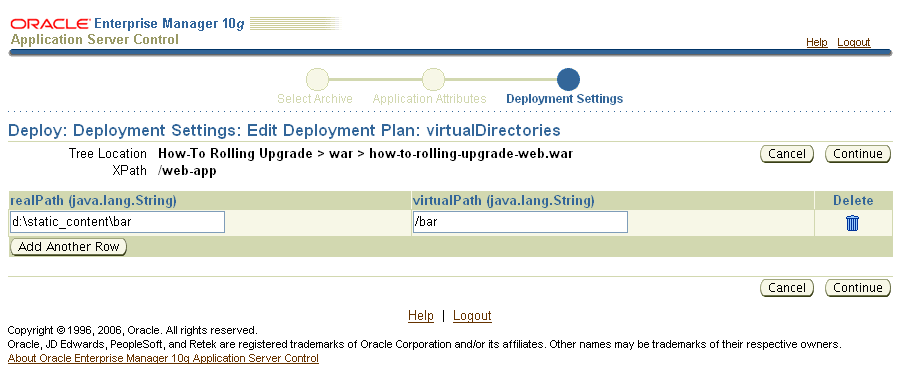
The OC4J web module supports setting a virtual directory. The virtual directory allows a web module to serve content from a physical directory outside of the actual deployed web module.

In the orion-web.xml file the tag is of this form:

<orion-web-app>
....
<virtual-directory virtual-path="/bar" real-path="D:\static_content\bar" />
</orion-web-app>

Which means that when the web module is deployed it can serve content directly from the self contained WAR file (and its sub-directories) via the URL of /foo.

But it also means that the web module can now also serve content from the directory specified as the real-path attribute via the URL of /foo/bar.

You can specify this virtual-directory setting using an embedded orion-web.xml in which it is already set OR with the OC4J 10.1.3 release you can use the funky Deployment Plan Editor to specify it at deployment time.


This can be handy for example when you have web modules which need to serve content which is being periodically generated by other services such as a report engine (or graphic designers updating HTML or images) but don't want to lump the content into the exploded directory of the web module.

02 May 2006

Another opmnctl Gem - sequential operations

Following yesterdays theme of handy but less well known opmnctl commands, here's another one I like.

If you want to start the processes OPMN is configured to manage on a sequential basis (ie one process is started and completes its startup before the next one) then you can use the command below.

$opmnctl startproc sequential=true

The usage text describes it succinctly as:

$opmnctl usage startproc

...
If the value of the sequential attribute is "true", each process or application targetted by the request will be acted upon sequentially (one at a time). The request order of affected managed-process dependencies will be honored.

01 May 2006

Hidden Gems in the OPMN opmnctl Utility

The opmnctl command has a few hidden gems. Well I'm sure they're well documented somewhere but I don't see too many people using them.

So my two picks for the day are:

1. Starting and stopping individual applications.

Yes that's right! The opmnctl utility can start and stop individual applications running on an OC4J instance under the control of OPMN.

The command form is:

$opmnctl stopproc application=FOO

where FOO is the name of the application.

This will cause the FOO application to be shutdown and the setting persisted in the OC4J j2ee/home/config/server.xml so that the application will be kept in the last requested state if/when the OC4J instance itself is restarted.

This command is particularly useful if you have wired together a few 10.1.3 instances in which the "Application Server Control" is active on each instance and you receive a warning when you use it that there are multiple instances running. It's a bit of a pain since ASC won't let you stop an ASC application, even if its not the current one. Therefore to stop an instance of ASC from running you can use this nice opmnctl facility.

Go to the $ORACLE_HOME/opmn/bin directory of the instance in which you want to stop ASC and type

$ opmnctl stopproc application=ascontrol
opmnctl: stopping opmn managed processes...

Further, if you have access to one instance of opmnctl which is mapped into the topology then you don't even need to go into the specific $ORACLE_HOME directory of the instance where you want to stop ASC. You can just add an "instance" scope to the command and point it at the instance where you want to stop ASC.

2. Live reporting

The default mode of operation of opmnctl is to report the output of its operations when all of the operations have completed.

If you are like me and like to see results as they happen, then you can give opmnctl an extra switch and it'll report status as it receives it.

You can do this by tacking on the additional switch

$opmnctl report=true

It's a little hard to visualize this, but the following comes in on a line-by-line basis as the individual activities are finishing -- not as a result blob at the very end of the restartproc operation

$opmnctl @cluster restartproc report=true
opmnctl: restarting opmn managed processes...
HTTP_Server/HTTP_Server/HTTP_Server/1,1770851305,3071: success
default_group/home/default_group/1,1770851307,27024: success
multi_group/multi/default_group/2,1770851317,27969: success
multi_group/multi/default_group/1,1770851318,27970: success
060426_ohsj2ee.stadp57.us.oracle.com: 4 of 4 processes restarted.

System Properties Using a Classloader Query

I noticed I had a post here which covers the basic way to dump out the current set of System properties.

Well there's an even easier way with OC4J(10.1.3) by using one of the pre-built classloader queries we have to do it.

The SystemProperties query will dump out a list of the current System properties. Below I show this used in conjuction with the Exit query which basically nukes the server after the queries have returned.

>java -Doc4j.start.query=SystemProperties+Exit -jar oc4j.jar

06/05/01 15:53:47 Shutting down OC4J...
System properties:

1. ajp.connection.listener.state = down
2. awt.toolkit = sun.awt.windows.WToolkit
3. com.sun.CORBA.connection.ORBSocketFactoryClass = oracle.oc4j.corba.iiop.
IIOPSSLSocketFactory
4. file.encoding = Cp1252
5. file.encoding.pkg = sun.io
6. file.separator = 7. java.awt.graphicsenv = sun.awt.Win32GraphicsEnvironment
8. java.awt.printerjob = sun.awt.windows.WPrinterJob
9. java.class.path = oc4j.jar
10. java.class.version = 49.0

... well you get the picture ...

04 April 2006

id·io·syn·cra·sies with createinstance

Talking with someone today about using the $ORACLE_HOME/bin/createinstance command, I thought it might be worth a short post to explain its use a little.

What createinstance does is to create a new OC4J instance within the $ORACLE_HOME in which it is exected.

It's usage pattern is something like:

$ORACLE_HOME/bin/createinstance -instanceName FOO

Which will create a new OC4J instance named FOO in $ORACLE_HOME.

In effect this does several things:

1. It creates the directory structure to host the new OC4J instance and its respective configuration files and deployed applications.

$ORACLE_HOME
/j2ee
/foo
/config
/applications
/application-deployments
/connectors
/...
/home


2. It updates the $ORACLE_HOME/opmn/conf/opmn.xml file, adds a new process-type entry to represent the new OC4J process to be managed and then calls OPMN to reload itself so it is aware of the new instance.
<process-type id="FOO" status="enabled">
<module-data>
<category id="start-parameters">
<data id="java-options" value="-server ...">
</data>
<category id="stop-parameters">
<data id="java-options" value="...">
</data>
</category>
<start timeout="600" retry="2">
<stop timeout="120">
<restart timeout="720" retry="2">
<port id="default-web-site" range="12501-12600"
protocol="ajp"></port>
<port id="rmi" range="12401-12500">
<port id="jms" range="12601-12700">
<process-set id="default_group" numprocs="1">
</process-set>

Now the thing of importance to note here is that there is an implicit assumption made. The new instance will be created as a CLONE of the "home" instance which is defined in the opmn.xml file. You have no explicit control over the shape of the new instance.

So what ... you may well say.

Well where this has an effect is in how the default-web-site port is configured -- if the home instance is configured to run in AJP mode then the new FOO instance would similarly be configured to run in AJP mode and will be preset with the default AJP port range of 12501-12600.

But if the home instance is configured to run in HTTP mode, then the new FOO instance will be configured to run in HTTP mode too -- in which case you must supply the port to use for the HTTP listener. The reason is that its common that a HTTP listener is configured to run at a known dedicated port instead of a range since its consumer is a user with a browser. So the port gets set to one known value.

If the default-web-site is running in HTTP mode then you MUST specify the port to use with the -port tag.

Here's the output when createinstance is run with the default-web-site set to run in HTTP mode:
[buttso@stadp57 bin]$ createinstance -instanceName FOO

Creating OC4J instance "FOO"...
Error creating new OC4J instance: Invalid protocol or port range.
This is a J2EE Server and Process Management install type.
Please specify the -port option on the command to create
the new instance.
So if the port is specified using the -port option
[buttso@stadp57 bin]$ createinstance -instanceName FOO -port 5001
Creating OC4J instance "FOO"...
Set OC4J administrator's password for "FOO" (password text
will not be displayed as it is entered)
Enter password:
Confirm password:
The password for OC4J administrator "oc4jadmin" has been set.
New OC4J instance "FOO" has been created.

Then the resulting entry in OPMN is:
<process-type id="<span style=">FOO" module-id="OC4J" status="enabled">
<module-data>
<category id="start-parameters">
<data id="java-options" value="-server -Djava.security.policy=...">
</data>
<category id="stop-parameters">
<data id="java-options" value="-Djava.security.policy=...">
</data>
</category>
<start timeout="600" retry="2">
<stop timeout="120">
<restart timeout="720" retry="2">
<port id="default-web-site" range="5001" protocol="http"></port>
<port id="rmi" range="12401-12500">
<port id="jms" range="12601-12700">
<process-set id="default_group" numprocs="1">
</process-set>
And to come to the end of a promised short but delivered long story, the default-web-site will be reachable directly using HTTP from a browser on port 5001.

Now if you want to change any of these settings of course you are free to do so by directly editing the $ORACLE_HOME/opmn/conf/opmn.xml to adjust the attributes to the desired values and then reload OPMN so they take effect.

Or you can use the opmnctl command to make a similar change. I usually do it by hand since I can remember the commands to operate vi ... ;-)

31 March 2006

Accessing SVN from JDeveloper

Accessing SVN from JDeveloper

An update is now available for JDeveloper to support using Subversion as a SCCS. Awesome.

Get the update!

Now to get it work however you need to manually install both an SVN client and a Java bridge. Reportedly this will change once the plugin evolves. But in the mean time this is what I found.

There are two different versions of a Java client for SVN which you can use with the JDeveloper SVN plugin. You can configure one or both of these, and then select which one to use in a JDeveloper subversion configuration dialog.

1. Download and install the SVN client from http://subversion.tigris.org.

2. Either Download and install the JavaHL SVN bridge

Find svn-win32-1.3.0_javahl.zip on the http://subversion.tigris.org website and download it.

Extract it.

Locate the file libsvnjavahl-1.dll within the extracted javahl distribution and copy it into the bin directory within the SVN client installation directory.

3. Or download and use JavaSVN

Find the org.tmatesoft.svn_1.0.3.standalone.zip distribution on the http://tmate.org/svn/ website and download it.

Unzip it.

Find the javasvn.jar file within the tmate distribution and copt it into the %JDEV_HOME%\jdev\extensions\\oracle.jdeveloper.subversion.10.1.3 directory.

Now fire up JDeveloper

Select the “Subversion” option from the Versioning > Select Versioning System menu.

Select the “SVN Navigator” from the View menu.

Create a new SVN connection in the SVN navigator and away you go.

07 December 2005

The Xtra Easy version of the Database

Oracle Database XE

All I can say so far is that this thing rocks.

http://www.oracle.com/technology/products/database/xe/index.html


Simple to install.
Simple to manage – dead easy in fact.
And … simple to import data from Excel!

The Seminal Classloading Paper for OC4J

For anyone working with OC4J prior to the 10.1.3 release and interested in knowing more about the way in which the classloaders work, this paper addresses most of the questions I've ever heard.

http://www.oracle.com/technology/tech/java/oc4j/pdf/ClassLoadingInOC4J_WP.pdf

23 November 2005

Dumping System Properties with OC4J

A Simple Dump of System Properties from a JSP With OC4J

A point was made recenttly that a query on Google returned zero hits for showing how to print details of the runtime environment with OC4J.

So here’s my attempt at getting at least one hit for how to do this.

Assumption – OC4J is running somewhere

Step1 – Open a text editor.

Step 2 – Enter the following into the editor.

<%@ page import="java.util.*, java.io.*"%>
<h3>System Properties</h3>
<hr/>
<pre>
<%
Properties props = System.getProperties();
props.list(new PrintWriter(out));
%>
</pre>

Step 3 – Save the file as $ORACLE_HOME/j2ee/home/default-web-app/sysprops.jsp

Step 4 – Access the page from a browser http://localhost:8888/sysprops.