Oracle WebLogic Server 12.1.3 provides full support for Java EE 6 and also adds support for a select set of APIs from Java EE 7.
The additional APIs are:
- JSR 356 - Java API for WebSocket 1.0
- JSR 353 - Java API for JSON Processing
- JSR 339 - Java API for RESTful Web Services 2.0
- JSR 338 - Java Persistence API 2.1
See the "What's New in 12.1.3 Guide" at
http://docs.oracle.com/middleware/1213/wls/NOTES/index.html#A1011612131 for more general information.
At runtime, the WebSocket and JSON Processing APIs are available as defaults and don't require any form of post installation task to be performed to enable their use by deployed applications.
On the other hand, the JPA and JAX-RS APIs require a step to enable them to be used by deployed applications.
Developing with the WebSocket and JSON Processing APIs using Maven
To create applications with these APIs for use with Oracle WebLogic Server 12.1.3, the API needs to be made available to the development environment. Typically when developing Java EE 6 applications, the javax:javaee-web-api artifact is used from the following dependency:
<dependency>
    <groupId>javax</groupId>
    <artifactId>javaee-web-api</artifactId>
    <version>6.0</version>
    <scope>provided</scope>
</dependency>
As the WebSocket and JSON Processing APIs are not part of the Java EE 6 API, they need to be added to the project as dependencies.
The obvious but
incorrect way to do this is to change the javax:javaee-web-api dependency to be version 7 so that they are provided as part of that dependency. This introduces the Java EE 7 API to the application, including APIs such as Servlet 3.1, EJB 3.2 and so forth which aren't yet supported by WebLogic Server. Thus it presents the application developer with APIs to use that may not be available on the target server.
The
correct way to add the WebSocket and JSON Processing APIs to the project is to add individual dependencies for each API using their individual published artifacts.
<dependency>
    <groupId>javax.websocket</groupId>
    <artifactId>javax.websocket-api</artifactId>
    <version>1.0</version>
    <scope>provided</scope>
</dependency>

<dependency>
    <groupId>javax.json</groupId>
    <artifactId>javax.json-api</artifactId>
    <version>1.0</version>
    <scope>provided</scope>
</dependency>
Using NetBeans, these dependencies can be quickly and correctly added using the code-assist dialog, which presents developers with options for how to resolve any missing classes that have been used in the code.
Using the JSON Processing API with WebSocket Applications
The JSON Processing API is particularly useful for WebSocket application development since it provides a simple and efficient API for parsing JSON messages into Java objects and for generating JSON from Java objects. These tasks are very typically performed in WebSocket applications using the Encoder and Decoder interfaces, which provides a mechanism for transforming custom Java objects into WebSocket messages for sending and converting WebSocket messages into Java objects.
An Encoder converts a Java object into a form able to send as a WebSocket message, typically using JSON as the format for use within Web browser based JavaScript clients.
package buttso.demo.cursor.websocket;

import java.util.logging.Level;
import java.util.logging.Logger;
import javax.json.Json;
import javax.json.JsonObject;
import javax.websocket.EncodeException;
import javax.websocket.Encoder;
import javax.websocket.EndpointConfig;

/**
 * Convert a MouseMessage into a JSON payload.
 *
 * @author sbutton
 */
public class MouseMessageEncoder implements Encoder.Text{

    private static final Logger logger = Logger.getLogger(MouseMessageEncoder.class.getName());

    @Override
    public String encode(MouseMessage mouseMessage) throws EncodeException {
        logger.log(Level.FINE, mouseMessage.toString());
        JsonObject jsonMouseMessage = Json.createObjectBuilder()
                .add("X", mouseMessage.getX())
                .add("Y", mouseMessage.getY())
                .add("Id", mouseMessage.getId())
                .build();
        logger.log(Level.FINE, jsonMouseMessage.toString());
        return jsonMouseMessage.toString();
    }

    @Override
    public void init(EndpointConfig ec) {
        // throw new UnsupportedOperationException("Not supported yet."); //To change body of generated methods, choose Tools | Templates.
    }

    @Override
    public void destroy() {
        // throw new UnsupportedOperationException("Not supported yet."); //To change body of generated methods, choose Tools | Templates.
    }

}
An Decoder takes a String from a WebSocket message and turns it into a custom Java object, typically receiving a JSON payload that has been constructed and sent from a Web browser based JavaScript client.
package buttso.demo.cursor.websocket;

import java.io.StringReader;
import java.util.logging.Level;
import java.util.logging.Logger;
import javax.json.Json;
import javax.json.JsonObject;
import javax.websocket.Decoder;
import javax.websocket.EndpointConfig;

/**
 * Converts a JSON payload into a MouseMessage
 *
 * @author sbutton
 */
public class MouseMessageDecoder implements Decoder.Text {

    private static final Logger logger = Logger.getLogger(MouseMessageDecoder.class.getName());

    @Override
    public MouseMessage decode(String message) {
        logger.log(Level.FINE, message);
        JsonObject jsonMouseMessage = Json.createReader(new StringReader(message)).readObject();
        MouseMessage mouseMessage = new MouseMessage();
        mouseMessage.setX(jsonMouseMessage.getInt("X"));
        mouseMessage.setY(jsonMouseMessage.getInt("Y"));
        logger.log(Level.FINE, mouseMessage.toString());
        return mouseMessage;
    }

    @Override
    public boolean willDecode(String string) {
        return true;
    }

    @Override
    public void init(EndpointConfig ec) {
        // throw new UnsupportedOperationException("Not supported yet."); //To change body of generated methods, choose Tools | Templates.
    }

    @Override
    public void destroy() {
        // throw new UnsupportedOperationException("Not supported yet."); //To change body of generated methods, choose Tools | Templates.
    }

}
The Encoder and Decoder implementations are specified as configuration elements on a WebSocket Endpoint (server and/or client) and are automatically invoked to perform the required conversion task.
@ServerEndpoint(value = "/mouse", decoders = MouseMessageDecoder.class, encoders = MouseMessageEncoder.class)
public class MouseWebSocket {

    private final Logger logger = Logger.getLogger(MouseWebSocket.class.getName());

    ...

    @OnMessage
    public void onMessage(Session peer, MouseMessage mouseMessage) throws EncodeException {
        logger.log(Level.FINE, "MouseMessage {0} from {1}", new Object[]{mouseMessage, peer.getId()});
        messages.add(mouseMessage);

        for (Session others : peer.getOpenSessions()) {
            try {
                if (!others.getId().equals(peer.getId())) {
                    mouseMessage.setId((int) peer.getUserProperties().get("id"));
                }
                others.getBasicRemote().sendObject(mouseMessage);
            } catch (IOException ex) {
                Logger.getLogger(MouseWebSocket.class.getName()).log(Level.SEVERE, null, ex);
            }

        }
    }

    ...
}
This example enables MouseMessage objects to be used in the WebSocket ServerEndpoint class to implement the required functionality and allow them to be transmitted in JSON format to and from clients. On the JavaScript client, the JSON representation is used to receive MouseMessages sent from the WebSocket Endpoint and to send MouseMessages to the same WebSocket Endpoint.
The JavaScript JSON API can be used to produce JSON representation of JavaScript objects as well as parse JSON payloads into JavaScript objects for use by the application code. For example, JavaScript logic can be used to send messages to WebSocket endpoints in JSON form using the JSON.stringify function and to create JavaScript objects from JSON messages received from a WebSocket message using the JSON.parse function.
    ...

    document.onmousemove = function(e) {
        if (tracking) {
            // send current mouse position to websocket in JSON format
            ws.send(JSON.stringify({X: e.pageX, Y: e.pageY}));
        }
    }


    ws.onmessage = function(e) {
        // convert JSON payload into JavaScript object
        mouseMessage = JSON.parse(e.data);

        // create page element using details from received
        // MouseMessage from the WebSocket
        point = document.createElement("div");
        point.style.position = "absolute";
        point.style.zIndex = mouseMessage.Id;
        point.style.left = mouseMessage.X + "px";
        point.style.top = mouseMessage.Y + "px";
        point.style.color = colors[mouseMessage.Id];
        point.innerHTML = "∗";
        document.getElementById("mouser").appendChild(point);
    };
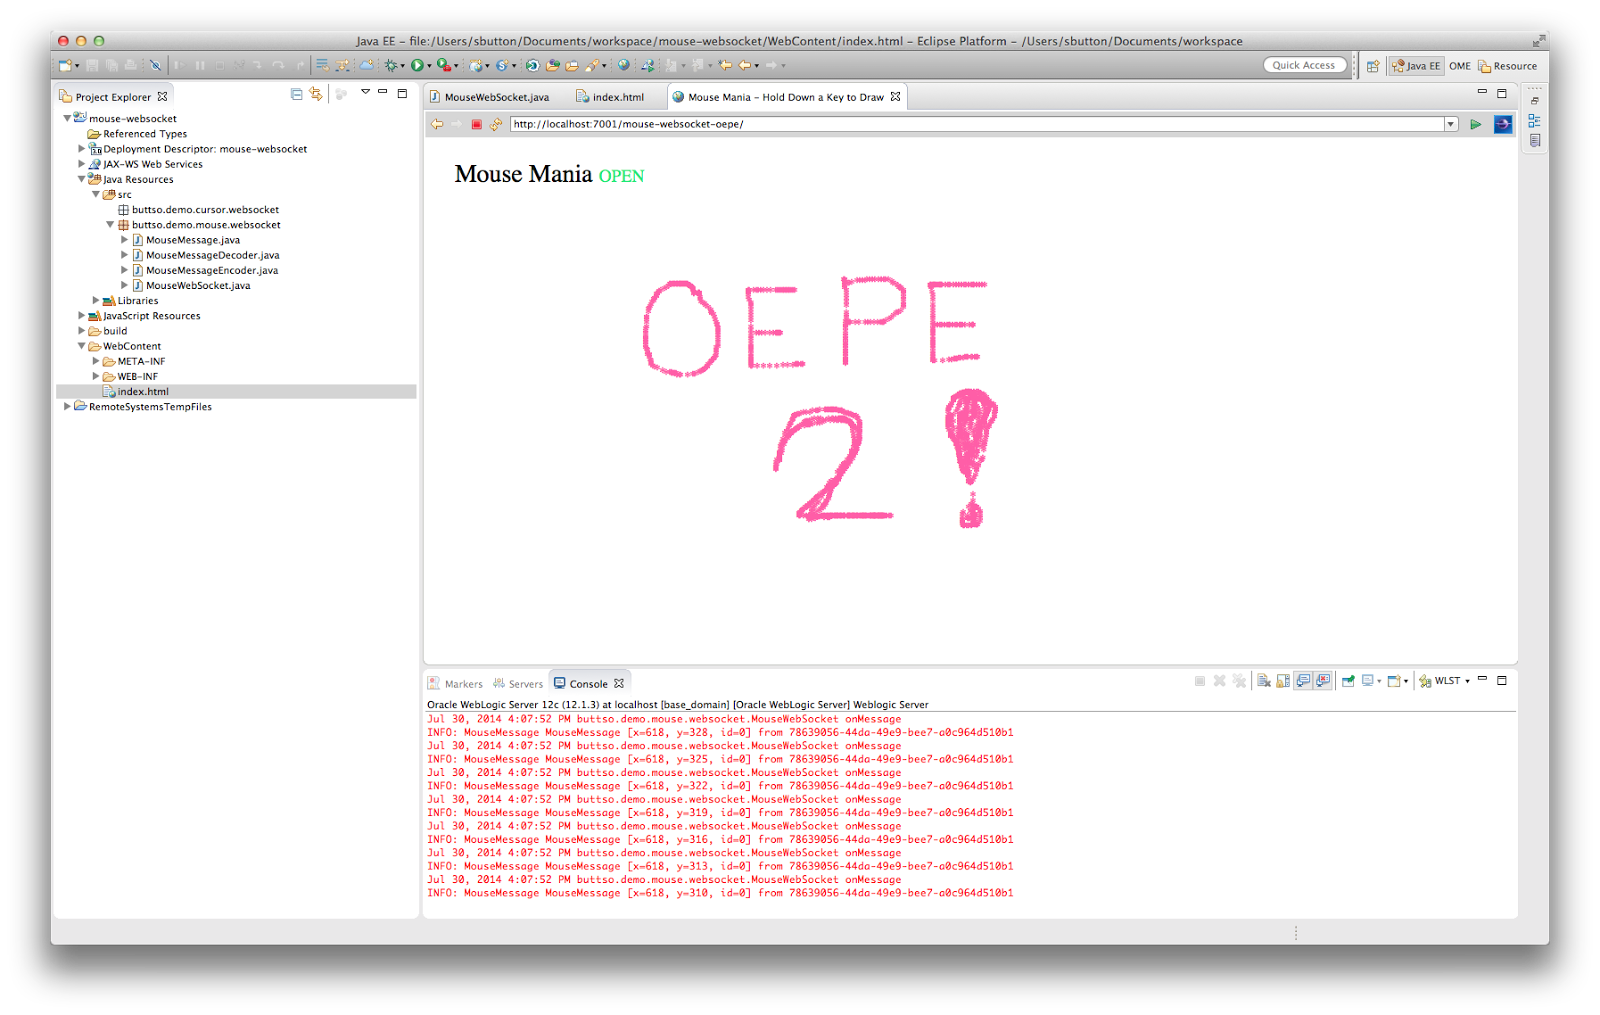
When running the application, the mouse events are captured from the Web client, send to the WebSocket endpoint in JSON form, converted into MouseMessages, decorated with an ID representing the client the message came from and then broadcast out to any other connect WebSocket client to display.
A very crude shared-drawing board.
 |
| Simulatenous drawing in browser windows using WebSocket and JSON Processing API |